
Set-up a new Mobile / Web App Asset
To leverage our SDKs within your application, you must first create an app asset within the Webex Connect platform. The asset configuration determines which SDK features are enabled and available for you to use.
When an app asset is configured the platform will assign an App ID and Client Key. These credentials must be provided to the SDK by your app and form part of the authentication process with the Webex Connect platform.
Important!
For enhanced security you should consider implementing JWT authentication.
In order to send push notifications or in-app messages to your app, the asset must be mapped to a service.
Note
Your account administrator should have been provided a URL to the Webex Connect Portal, this URL is unique to your account. If you do not have your account URL, please contact your account administrator.
Create a Mobile App Asset in Webex Connect
- Log in to your Webex Connect Portal account using your unique account URL.
- Navigate to Assets > Apps. The Apps page is displayed.

- Click Configure New App > Mobile / Web.

- In the app configuration screen, enter a name for your app and make a note of CLIENT KEY provided within the Access Credentials section.

- Within the Push Notifications section, hover over the Platform Type and click Configure to configure OS-specific Push Notification settings.

Note
The information required to configure each platform will vary as it is specific to each platform, but for the sake of this tutorial we will configure push notifications for the Android platform.
Configure Push-Notification channel for Android
In the pop-up that appears, you'll see both FCM and HMS configurations. You can configure either one or both.
- To configure FCM based Push Notification: Upload Firebase Service Account JSON file. For more information refer to Capture the Firebase Service Account JSON File
- To configure HMS based Push: If supporting Huawei HMS, enter the Huawei In-App ID and Secret. For more information refer to Capture the Huawei App Id and App Secret
Copy the code snippet provided in the 'PERMISSIONS' section and paste it in your manifest.xml file.

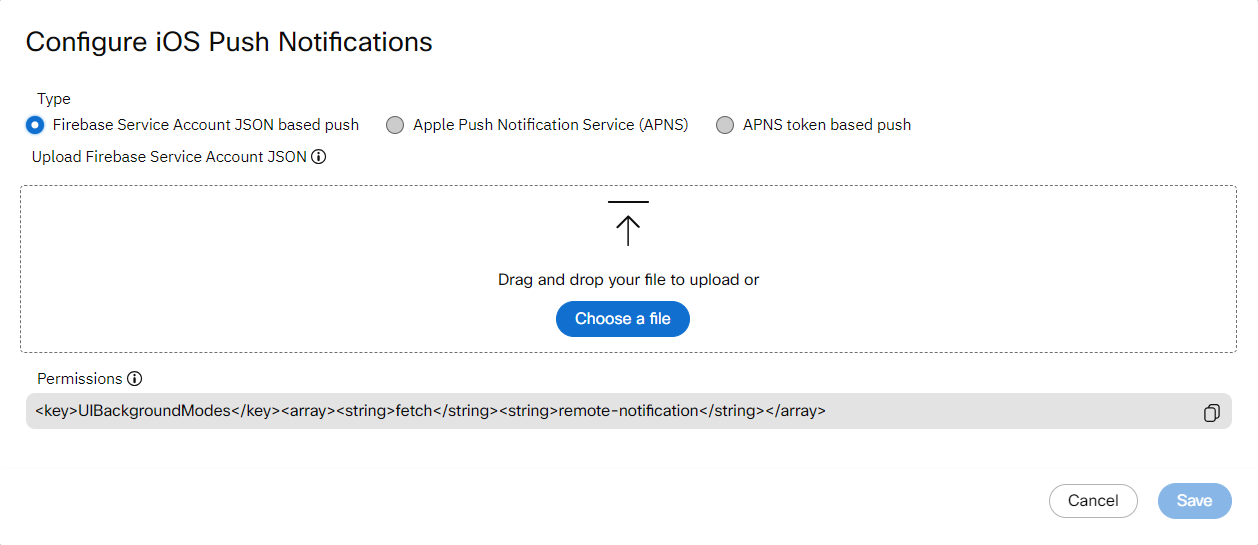
Configure Push-Notification channel for iOS
In the pop-up that appears, you can configure iOS push notifications in three different ways. To configure iOS push notifications for any of the three options, please select the appropriate option:
- Firebase Service Account JSON-based push
- Apple Push Notification Service
- APNs token based push
Firebase Service Account JSON-based push
The configurations to use Firebase Service Account JSON based push for iOS push notifications is the same as that of Android.
Apple Push Notification Service (APNS)
If you want to use APNS as the Push Notification gateway, follow the steps below:
Prerequisite: To create to the certificate, refer to the iOS SDK Quickstart Guide
- Enter the Certificate Password.
- Select APNS Type gateway from dropdown for your project.
- Sandbox: Select the Sandbox option to target your development app.
- Production: Select the Production option when sending push message to your production ready app.
- Upload the APNS Certificate file.
- Enter the Name and click Validate.
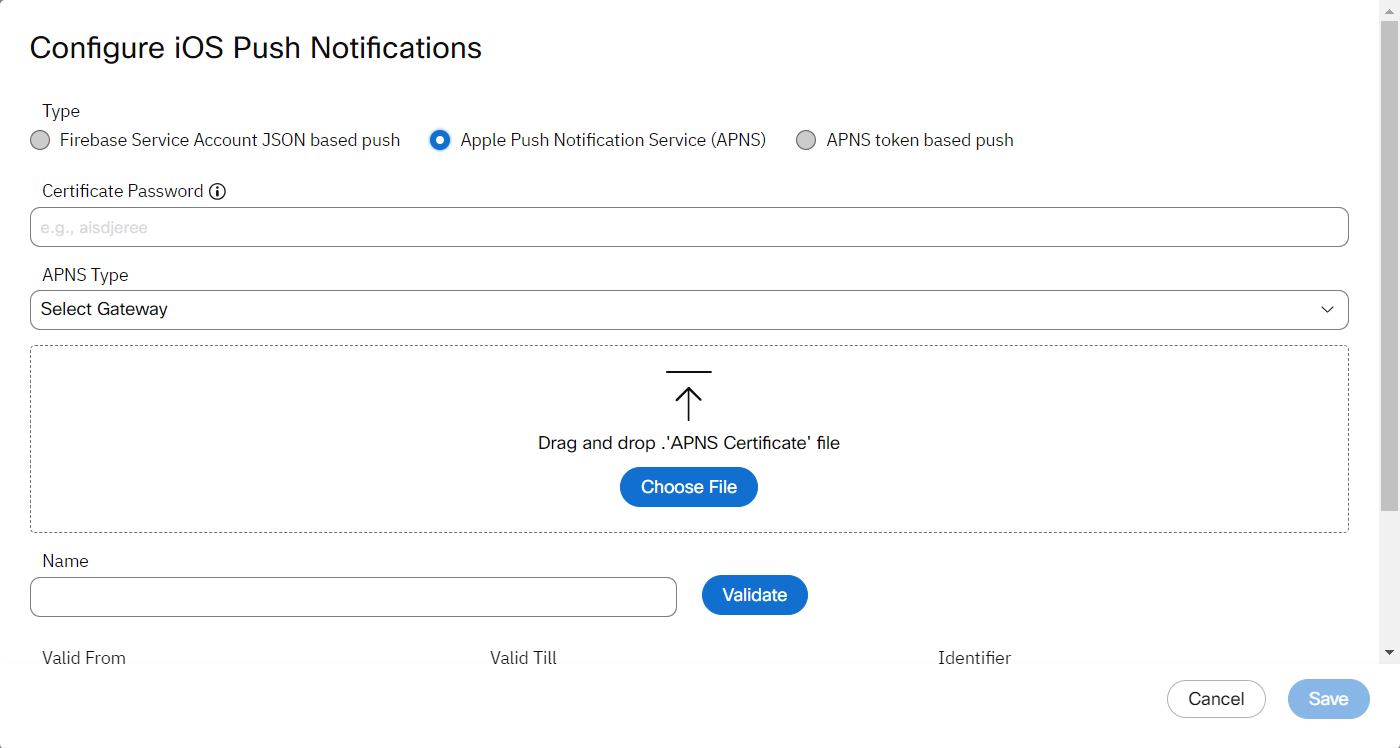
Supported Certificate Format
Currently,
.p12is the only certificate format supported.
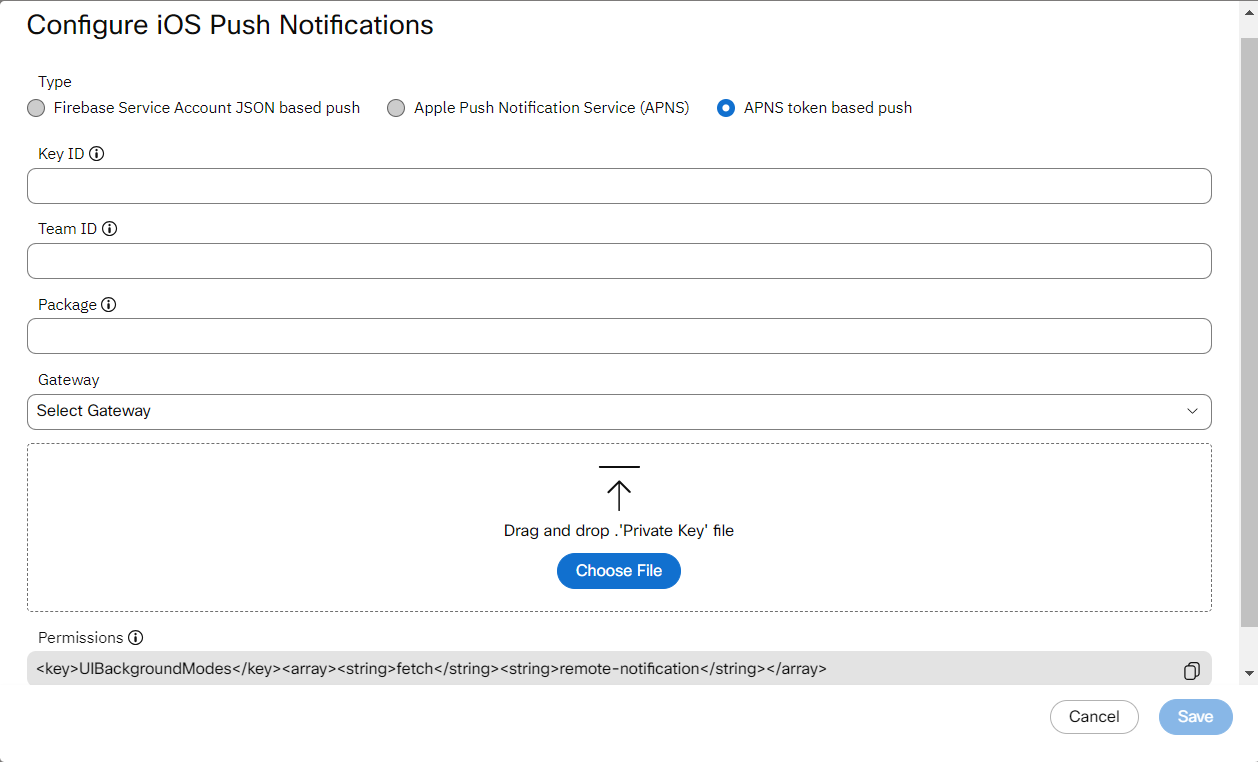
APNS token based push
Prerequisite: To create to the certificate, click the link: iOS SDK Quickstart Guide
If you want to use APNs token based push, follow the below steps:
- Enter the KeyId for the Authentication token.
- Enter the Team ID for your Apple Account. You can find it from “View Account”.
- Enter the BundleId of your Package project.
- Select one of the Gateway from dropdown:
- Sandbox: To target your development app select the Sandbox.
- Production: Select the Production when sending push to your production ready app.
- Upload the Private Key file.
- Click Save.
Configure Push-Notification channel for Web-browser
To add a web application in Webex Connect, follow these steps:
- From the menu bar, go to Assets, and click Apps .
- Click Configure New App > Mobile / Web.

Adding to Webex Connect
- Enter the Name for your application.
- Select the Web platform and click Configure. Based on the selected platform, supported browsers screen appears.

-
Select browser and click Configure. The Configure Chrome and Firefox Push Notifications pop-up appears.
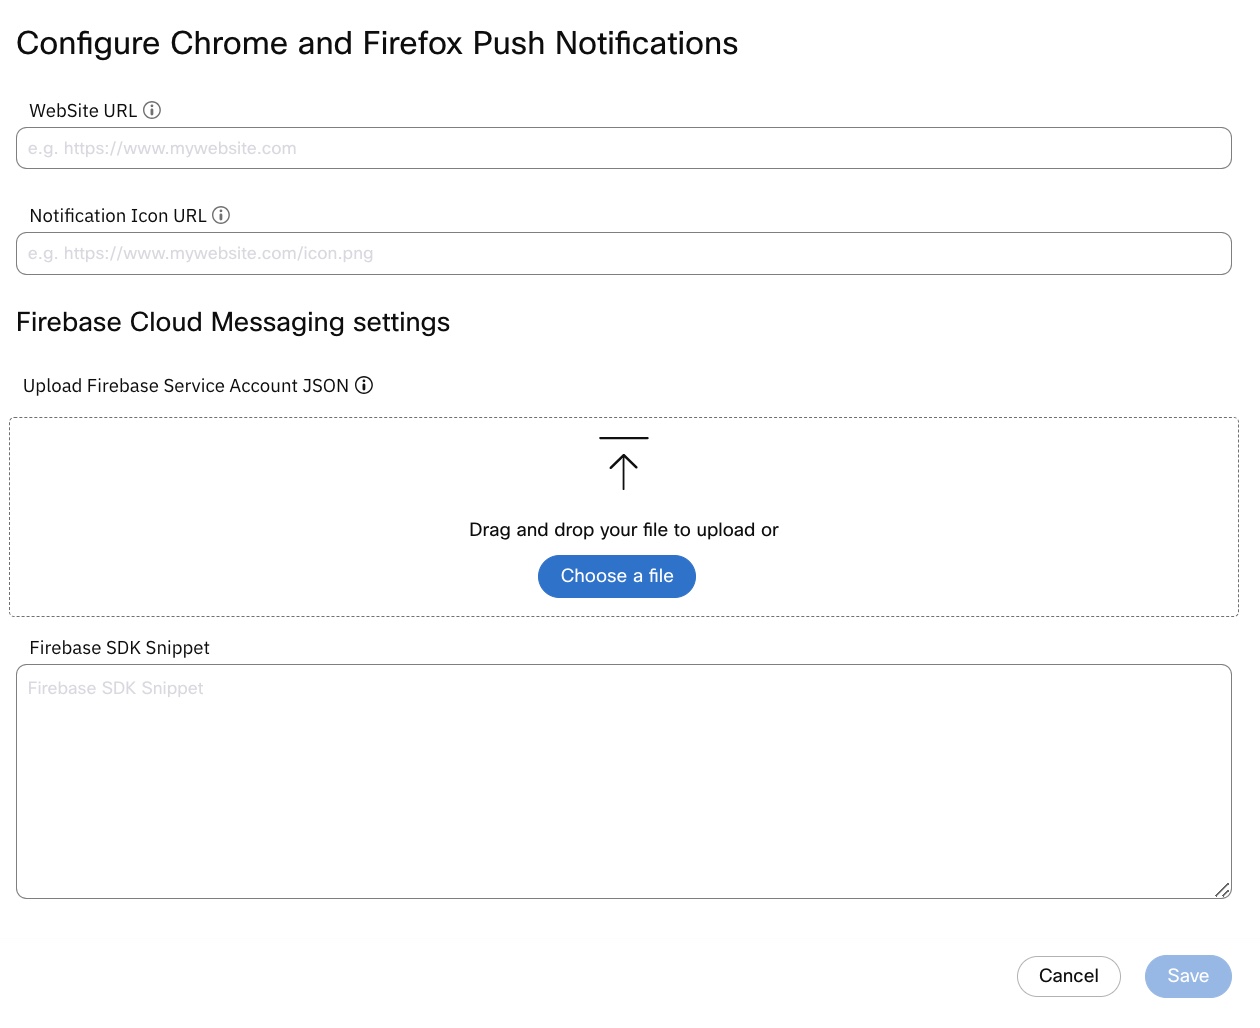
Configure Chrome and Firefox Push Notifications
-
Enter the following fields to configure Chrome and Firefox browsers:
a. Website URL: Enter the URL of the website to configure Web Push notification.
b. Notification Icon: Enter the path of the notification icon. The size of the icon should be 80x80.
c. Upload Firebase Service Account JSON: Upload the JSON file that contains the private key to access the FCM HTTP v1 API. To generate a new private key, go to Service accounts in your Firebase project settings.
Note: For existing clients, you can see both FCM Server details and also Upload Firebase Service Account JSON. It is recommended to migrate to FCM HTTP v1 API (JSON file) by June 2024.
d. Firebase SDK Snippet: Enter the Firebase SDK Snippet generated in the section Setup FCM for Chrome and Firefox Browsers
e. Click Save.

Configure Chrome and Firefox Push Notifications
- Enter the following fields to configure Safari browser:
a. Site Name: The name that is entered is displayed on the notification.
b. Site URL: The URL that is used to validate the identity of the website requesting push notifications using your ID. Only the website that matches the URL can use your Webex Connect ID for push notifications.
c. Notification Icons: It is mandatory to upload all five icons. Click the respective buttons to upload the icons.
d. APNS Credentials: Enter the password that is set while generating the certificate in the section Setup APNS for Safari Browser. Leave this field blank if the certificate was generated without a password.
e. Name: Enter the name of the APNS file and click Validate. Once the file is validated, the Valid From, Valid Till, and Identifier are auto populated.
f. Upload the .p12 certificate .
g. Click Save.

Configure Safari Push Notification
- Configure Live Chat / In-App Messaging's Transport and Security settings.
| Feature | Settings |
|---|---|
| Real-time messaging | Transport protocols Two transport protocols are available for establishing Live Chat / In-App Messaging connection with Webex Connect. They are Web Socket and MQTT. You can configure them as primary and secondary. In case the connection is not established on the primary protocol, it will fall back to secondary protocol. Security settings Enable secured ports to establish Live Chat / In-App Messaging connection on the secured port for MQTT and WebSocket as an extra layer of security. Enable Live Chat / In-App Messaging payload encryption to encrypt the Live Chat / In-App Messaging payload in transit. |
- Click Save.
A confirmation message appears when the application is created successfully.
Download and Integrate JavaScript SDK
- When the web app is added successfully, you can notice a DOWNLOAD link under Web configuration section. Click the link to download the JavaScript SDK.

App download for Chrome and Firefox

App download for Safari
- Extract the zip file, to a location on your local computer. You will notice js, manifest folders and sw.js file.
- Copy sw.js file, js, and manifest folder to the root folder of your web application.
- To request web push permission, the user should be registered. Once the user is registered, the JS SDK will automatically request permission to send notifications. Please refer to the section Web-Push-Popup for sample codes and add them into your .html file.
Enable In-App Messaging
- Enable In-App messaging and select the primary and secondary connection protocol from the select list
Note
Two transport protocols are available for establishing an In-App Messaging connection with imiconnect - Web Socket and MQTT. You can configure them as primary and secondary. If a connection fails to establish on the primary protocol, it falls back to the secondary protocol.
- For an end-to-end encrypted messaging service, you must select both the check-boxes (Use Secured Port and Enable Payload Encryption) as shown in the image.
Note
It is mandatory to select the Use Secure Port option to establish the connection between MQTT and Web Socket respectively.

Advanced Settings
You will see the following options under Advanced Settings. Select the required options as per your requirement.
- Device Attributes for Mobile Apps
- JWT Authorization
- Allow Multi User Registrations on Same Device
- Single Device Per User
- Server Side Inbox
- Data Stream
Device Attributes for Mobile Apps
To enable Device Attributes for mobile apps, follow the procedure below:
Note
This feature is optional.
- To monitor device attributes, like IMEI No., Geo-Location, etc, enable Device Attributes under Advanced Settings and click Configure as shown below.

- In the pop-up that appears, select the device attributes you wish to monitor.
- Next, define the monitoring frequency by selecting an interval from the select-list available.
- Copy the code snippet available in the 'Permissions' section and paste it in your
manifest.xmlfile in case of Android or plist file in case of iOS.

Device Attribute configuration for iOS

Device Attribute configuration for Android
JWT Authorization
- Select JWT Authorization under Advanced Settings, if you want to authorize all communications over in-app messaging. Once enabled, you'll need to provide the JWT secret key that will be used for validation.
- If you want to authorize all communications over in-app messaging, you can do so by enabling JWT Authorization. Once enabled, you'll need to provide the JWT Secret Key that will be used for validation.

Note
To enable JWT authentication for Thread, Topic, and Segment APIs, please reach out to the support team, once you have enabled the above configuration.
Allow Multi User Registrations on Same Device
- By default the Allow Multi User Registrations on Same Device is enabled. If you do not need this feature you can disable this.
Note
"Multi-User Registration allows you to have multiple users registered from a single device at the same time. This will ensure that push notification sent to any of the registered user will be delivered on the device. However if the notification is sent to all the users registered on a device parallelly, you would see duplicate push notifications on that given device "

Single Device Per User
- Select Single Device Per User, to restrict access to the application to one user per device. If you register on a new device, you will stop receiving push notifications on the older device.
You can enable this feature at an app asset level from Mobile/Web app asset configuration screen.
Server Side Inbox
- Select Server Side Inbox toggle, if you want to store of data on server of Webex Connect. By default it is enabled for all the existing tenants. Only a tenant owner, a full access user, or a limited access user can enable or disable the option. Once server side inbox is enabled, all new messages will have a server side copy for future downloads. If the Server Side Inbox is disabled, new messages are not stored on server side. These messages will be delivered only once and post that, you must maintain a copy of these messages on your server for future reference.
Data Stream
- Toggle the Data Stream option to enable it at an asset level to send the messaging APIs (WhatsApp, RCS, Apple Message for Business and In-App Messaging) and receive a copy of the data from Outbound messages and Delivery Receipts for the Integration selected.
Select the required integrations from the drop-down. You can select one or more integrations using the checkboxes. Use the Select All option to select all the integrations.
- Click Save to complete your app asset creation process and click the back button, to land on the apps page. You can now see your app listed with an App-ID.
You'll have to embed this APP ID in your app code. You can learn more about it in Quickstart guides available in each SDK documentation.

To configure a project, visit Project Setup
Updated 5 months ago