
iOS SDK Quickstart Guide
The Webex Connect iOS SDK provides a messaging framework that enables app developers to integrate Webex Connect's In-App and Push messaging services within their mobile applications.
Optional monitoring of device attributes allows change events to be reported back to the Webex Connect platform and values stored against the customer’s profile. These events may then be used to enrich user engagement through the triggering of rules and flows to send messages that may be more relevant to the user.
This Quickstart guide explains all the necessary steps that are required to integrate the Webex Connect iOS SDK within an application.
Prerequisites
The minimum requirements to use the Webex Connect SDK are:
| Component | Requirements |
|---|---|
| OS | iOS 11 or higher. |
| Software | Xcode 9.0 and above Webex Connect iOS SDK |
| Accounts | An active Apple developer account An active Webex Connect tenant. |
SDK Version vs OS Version
| SDK | SDK Version | Min Supported OS | TLS Support |
|---|---|---|---|
| iOS | 2.15.5 onwards. | iOS 11 or higher. | iOS there is no issue for supporting TLS 1.2 support for min supported version is iOS 11 and higher. |
| iOS | 2.13.0 to 2.15.4 | iOS 9 or higher. | iOS there is no issue for supporting TLS 1.2 support for min supported version is iOS 9 and higher. |
| iOS | till 2.12.1. | iOS 8 or higher. | iOS there is no issue for supporting TLS 1.2 support for min supported version is iOS 8 and higher. |
Configuration Tasks
Complete the following tasks to use Webex Connect SDK for your Mobile Application:
Installation
You can install Webex Connect SDKs by using any one of the following methods:
Method 1: Manual Installation
This section provides the steps necessary for adding and configuring the Webex Connect SDK within your XCode project.
- Click here to navigate to the GitHub repository. Once you're in the GitHub repository, proceed to the Releases section, and always ensure to choose the latest release. Under the Assets section, you can find the necessary files.
- Download the iOS Core SDK. As we have different flavours of SDKs, please download the required SDK (Full or Lite). If you want to download the Full SDK, you can choose either WebexConnectCoreSDKFull_CP.zip or WebexConnectCoreSDKFull_SPM.zip. If you want to download the Lite SDK, you can choose either WebexConnectCoreSDKLite_CP.zip or WebexConnectCoreSDKLite_SPM.zip. To learn more about the SDK flavors, click here.
- Unzip the SDK and drag-drop the
IMIconnectCoreSDK.xcframeworkfile into your XCode project. - Select Create groups and Copy if needed in the prompt that appears.
- Select your project within the navigator. Click the General tab and go to the Frameworks section and change Embed status to Embed & Sign for IMIconnectCoreSDK.xcframework.

Embedded Binaries
- Click the Build Settings tab and add the flag –ObjC to the Other Linker Flags setting.
Method 2: Cocoa Pods
Assuming you already have an Xcode project, e.g. MyWebexConnectApp, for your iOS app, here are the steps to integrate the Webex Connect iOS SDK into your Xcode project using CocoaPods:
1. Install CocoaPods:
gem install cocoapods
- Setup CocoaPods:
pod setup
- Create a new file, Podfile, with following content in your MyWebexConnectApp project directory:
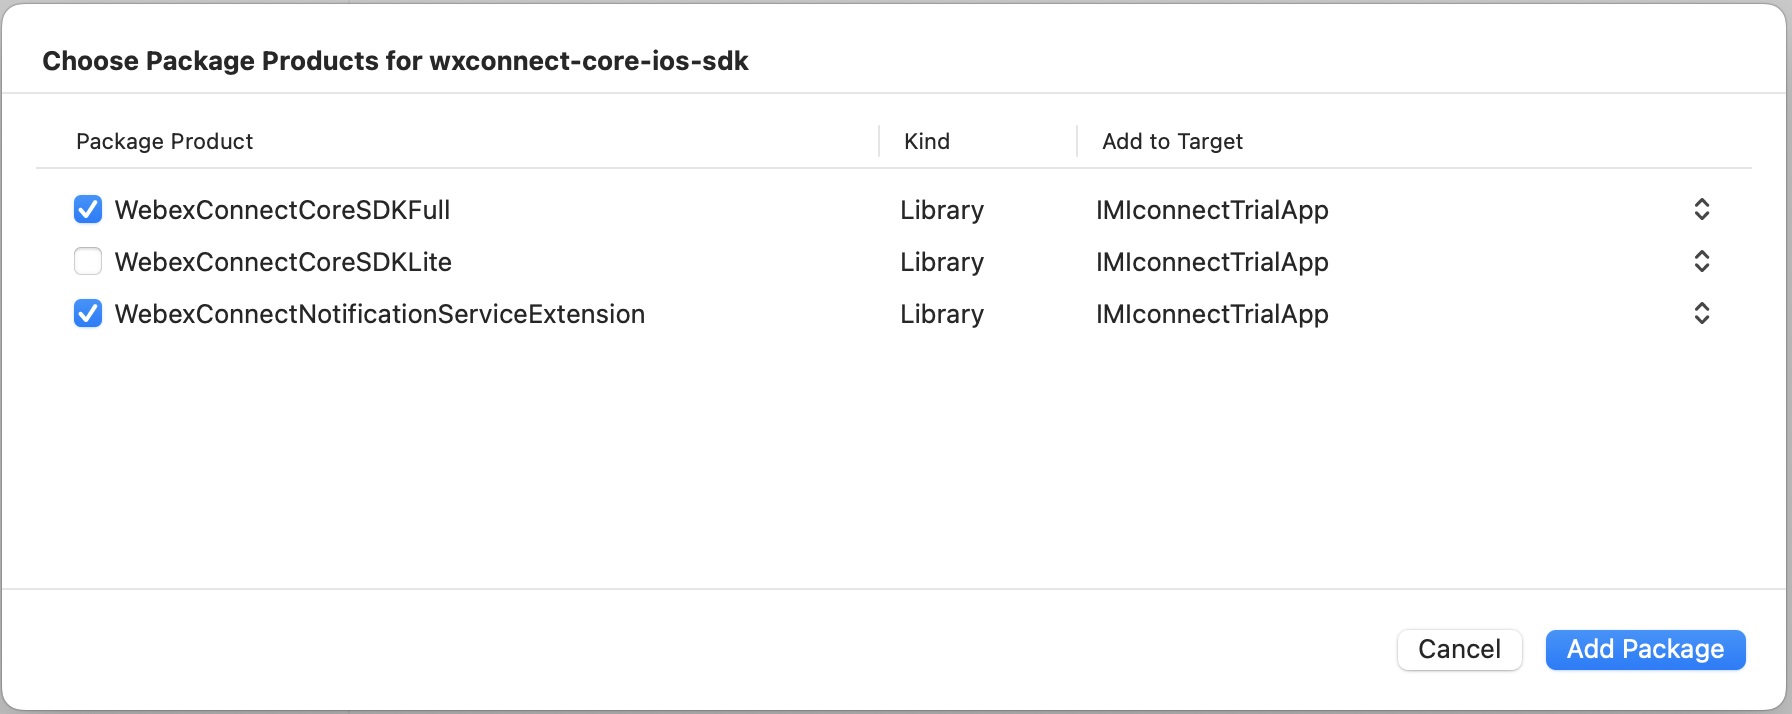
- Full SDK: WebexConnectCoreSDKFull
source 'https://github.com/CocoaPods/Specs.git'
- Full SDK: WebexConnectCoreSDKFull
target 'MyWebexConnectApp' do
platform :ios, '13.0'
pod 'WebexConnectCoreSDKFull'
end
ii. **Lite SDK** : WebexConnectCoreSDKLite
target 'MyWebexConnectApp' do
platform :ios, '13.0'
pod 'WebexConnectCoreSDKLite'
end
iii. **Notification Service Extension** : WebexConnectNotificationServiceExtension
target 'MyWebexConnectAppServiceExtension' do
platform :ios, '13.0'
pod 'WebexConnectNotificationServiceExtension'
end
- Install the Webex Connect iOS SDK from your MyWebexConnectApp project directory:
pod install
Method 3: Swift Package Manager
To add a WebexConnectCoreSDK to your Xcode project,
- select File > Add Packages and enter repository URL https://github.com/webex/wxconnect-core-ios-sdk.
You can also navigate to your target’s General pane, and in the “Frameworks, Libraries, and Embedded Content” section, click the + button, select Add Other, and choose Add Package Dependency.
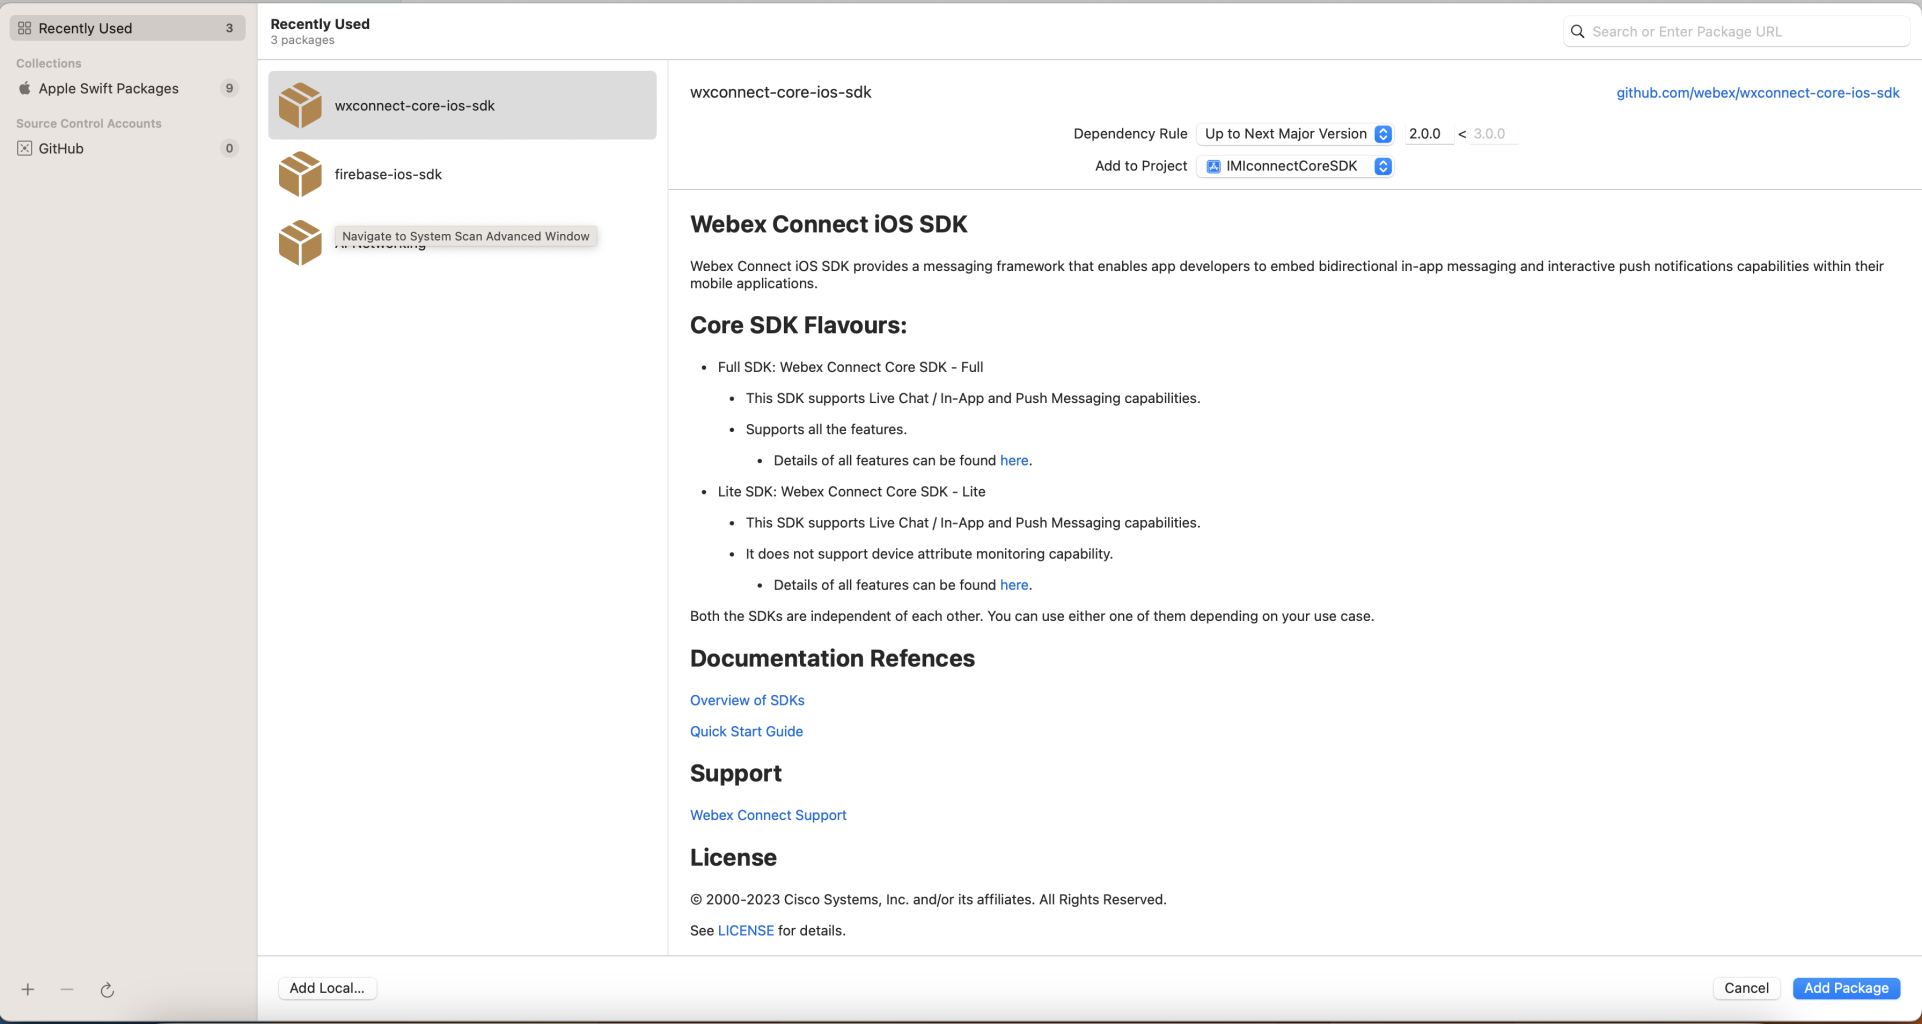
- Choose the Package and click Add Package.
Project Setup
- Add Custom iOS Target Properties to your project:
a. Select your project within the Project Navigator.
b. Click Info.
c. Click the (+) that appears when you hover the mouse over any line within the list.
d. Add the following key:
To use location services or geofences, add the following keys and provide relevant descriptions:- Privacy - Location Always and When In Use Usage Description
- Privacy - Location Always Usage Description
- Privacy - Location When In Use Usage Description
Location Services
To enable location services regardless of whether your app is in use, add the first two keys.
To enable location services only when your app is in use, add the 3rd key.
- Enable push notifications:
a. Click your project within the File Navigator.
b. Click Targets > Select Application Target > Signing & Capabilities.
c. Add Push Notifications capability.

- Add required Background Modes.
a. Click your project within the File Navigator.
b. Click Targets > Select Application Target > Signing & Capabilities.
c. Add Background Modes Capability.
d. Enable Location Updates, Background fetch & Remote notifications.

Swift Project Setup
This section is only relevant to Swift enabled projects, skip this section if you do not use Swift.
Projects that use Swift require a bridging header to expose the SDK APIs to the Swift code.
- Click File > New.
- Within the Source section, select Header File and click Next.

Choose a Template
- Name it as {Your project name}-Bridging-Header.h.

Save As Dialog
- Select your project within the File Explorer
- Select your app target in the Build Settings tab and search for Bridging Header.
- In the Swift Compiler – General, locate the Objective-C Bridging Header key and add the location of the bridging header file.

Swift Compiler - General
- Open your bridging header and add the following code:
#import "IMIconnectCoreSDK/IMIconnectCoreSDK.h"
The Webex Connect SDK APIs will now be accessible from your Swift code.
Setup APNS
This section will guide you through the configuration process for the Apple Push Notification Service (APNS).
- Go to the Apple Developer Portal and login to your account.
- Proceed to Certificates, Identifiers & Profiles.
- Click Certificates -> All.
- Click the + button to add a new certificate.

iOS Certificates
- Select the Apple Push Notification service SSL (Sandbox & Production) option.

New Push Certificate
- Select your App ID from the drop-down list and click Continue.

Create Certificate Signing Request (CSR)
- Follow the on-screen instructions to create a Certificate Signing Request.
- Click Continue.

- Click Choose File and select the certificate file that was created in the previous step.

- Click Generate.
Download, install & export the certificate
Once the APNS SSL certificate has been generated it must be downloaded, installed to your Keychain, and exported as a .p12 file.
- Click Download to download the certificate.

- Open the certificate to install it to your Keychain.
- Within Keychain Access:
- Select the login keychain and the category as My Certificates.
- Locate and select the certificate.
- Right-click and select Export .
- Save the certificate as a
.p12file.

Keychain Access
P12 File Export
The exported .p12 file will be used later when configuring your app within Webex Connect.
Configuring iOS .p8 Key for Token-Based Connection to APNs
This section will guide you through the configuration process for iOS .p8 Key for Token-Based Connection to APNS.
- Navigate to Apple Developer Portal and login to your account.
- Proceed to Certificates, Identifiers & Profiles.
- Click Keys from the side navigation, then click the Add button (+).
- Enter a unique key name to Register a New Key and select the Apple Push Notifications service (APNs) checkbox.
- Click Continue. You are automatically landed to a page with the option to Download the .p8 auth key file.
- Click Download. The text file with a .p8 file extension is downloaded.
Note
Please ensure you store this file securely as the key is not retained in your developer account and can be retrieved only once. If you lost the key file, you will need to revoke it and register a new one.
Firebase Cloud Messaging Integration
SDK Versions till 2.12.0
For SDK versions till 2.12.0, to build an app, you must integrate the Firebase Cloud Messaging (FCM), refer to the official FCM Guide and add GoogleService-Info.plist in your project.
SDK Version 2.12.1
For SDK version 2.12.1, install Firebase through pods. Use pod 'Firebase/Messaging' in your pod file. This is because Firebase has been moved out of SDK in this version and dependency has been added through dependency manager pods.
SDK Version 2.13.0 onwards
For SDK 2.13.0 version onwards, follow the steps given below to enable Firebase Push Notifications:
- Integrate FCM with your application using any of the dependency managers like Cocoa Pods, Carthage, or Swift Package Manager.
- Use the public APIs in the ICFCMPushProvider class to pass the required push token details to the Webex Connect Core SDK. Use the methods:
| Method | Description |
|---|---|
(NSString *)getToken | Gets the FCM push registration token |
(void) subscribeToTopic:(NSString *)topic completionHandler:(void (^)(NSError * _Nullable error))completionHandler; | Subscribes to a topic |
(void) unsubscribeFromTopic:(NSString *)topic; | Unsubscribes to a topic |
- Create a class that will confirm to
ICFCMPushProviderprotocol and implements the FCM related methods as shown below:
FCMPushProvider.h

#import <Foundation/Foundation.h>
#import <imiconnectCoreSDK/IMIconnectCoreSDK.h>

NS_ASSUME_NONNULL_BEGIN

@interface FCMPushProvider :NSObject <ICFCMPushProvider>

@end

NS_ASSUME_NONNULL_END


FCMPushProvider.m

#import "FCMPushProvider.h"
@import Firebase;
@interface FCMPushProvider()<FIRMessagingDelegate>
@property (nonatomic) NSString *fcmToken;
@end

@implementation FCMPushProvider
- (instancetype)init
{
    if (self = [super init])
    {
        [FIRApp configure];
        [FIRMessaging messaging].delegate = self;
    }
    return self;
}
- (nonnull NSString *)getToken
{
    return self.fcmToken;
}
- (void)subscribeToTopic:(nonnull NSString *)topic completionHandler:(nonnull void (^)(NSError * _Nullable))completionHandler
{
    [[FIRMessaging messaging] subscribeToTopic:topic completion:completionHandler];
}
- (void)unsubscribeFromTopic:(nonnull NSString *)topic
{
    [[FIRMessaging messaging] unsubscribeFromTopic:topic];
}
- (void)registerForFCM
{
    @try
    {
        [FIRApp configure];
        [FIRMessaging messaging].delegate = self;
    }
    @catch (NSException *exception)
    {
        NSLog(@"Firebase exception: %@",exception.reason);
    }

    // Add observer for InstanceID token refresh callback.
    [[NSNotificationCenter defaultCenter] addObserver:self selector:@selector(didFCMRefreshToken:)
                                                 name:kFIRInstanceIDTokenRefreshNotification object:nil];
}
// [START refresh_token]
-(void)messaging:(FIRMessaging *)messaging didReceiveRegistrationToken:(NSString *)fcmToken
{
    NSLog(@"FCM registration token: %@", fcmToken);

    self.fcmToken = fcmToken;

    [self processFCMPushToken];
}
// [END refresh_token]
-(void)didFCMRefreshToken:(NSNotification *)notification
{
    // Note that this callback will be fired everytime a new token is generated, including the first
    // time. So if you need to retrieve the token as soon as it is available this is where that
    // should be done.
    [[FIRInstanceID instanceID] instanceIDWithHandler:^(FIRInstanceIDResult * _Nullable result, NSError * _Nullable error) {
        if (error == nil) {
            NSString *refreshedToken = result.token;
            self.fcmToken = refreshedToken;

            [self processFCMPushToken];
        }
    }];
}
-(void)applicationReceivedRemoteMessage:(FIRMessagingRemoteMessage *)remoteMessage
{

}
- (void)processFCMPushToken
{
    if([IMIconnect isRegistered])
    {
        [[ICMessaging shared] processFCMPushToken:self.fcmToken];
    }
}


@end
Add a Mobile Application
Fore more information, refer to the link.
Code Integration
Follow the steps below to integrate the Webex Connect SDK within your application:
a. Create IMIconnectConfiguration.plist
b. Configure the App Delegate
c. Register a device
d. Receive messages
e. Connect to Webex Connect
f. Listen for connection status events
g. Fetch Topics
h. Subscribe to a Topic
i. Unsubscribe from a Topic
j. Create a Thread
k. Publish a Message
l. Disconnect from Webex Connect
Create IMIconnectConfiguration.plist
Within your Xcode project, create a new plist file named IMIconnectConfiguration.plist and copy the following snippet into the file.
<?xml version="1.0" encoding="UTF-8"?>
<!DOCTYPE plist PUBLIC "-//Apple//DTD PLIST 1.0//EN" "http://www.apple.com/DTDs/PropertyList-1.0.dtd">
<plist version="1.0">
<dict>
	<key>appId</key>
	<string>Your Application ID</string>
	<key>clientKey</key>
	<string>Your Client Key</string>
  <key>groupIdentifier</key>
  <string>Your Group Identifier</string>
</dict>
</plist>
Ensure you set the appId and clientKey values to those that you generated earlier in this guide.
Note
Add the following key/value pair in your
plist, if you want to configure your server domain to override the zero-rating domain.
<key>serverDomain</key>
<string>Your server domain</string>
Configure the App Delegate
You can configure the app delegate using one of the below two options to handle remote notifications:
- Option 1: Subclass ICAppDelegate
- Option 2: Use Method Swizzling - applicable only for SDK 2.13.0 version and later
Option 1: Subclass ICAppDelegate
The SDK provides the ICAppDelegate class which contains a lot of the boilerplate code that is required for a working SDK integration. It is highly recommended that you inherit from this class from your own app delegate. If this is not possible, then you may instantiate an instance of the class and chain calls from your app delegate to the ICAppDelegate.
- Open your
AppDelegate.hfile. - Change your AppDelegate class to inherit from
ICAppDelegate.
@interface AppDelegate : ICAppDelegate //Inherit from ICAppDelegate
@end
When using inheritance, ensure that you call through to the super implementation if you override any of the AppDelegate methods. If you do not, the SDK may not function as intended.
If you do not wish to, or cannot, use inheritance:
- Create an instance of
ICAppDelegatewithin yourAppDelegateclass. - Invoke the corresponding ICAppDelegate methods from your AppDelegate methods as per the following list:
- (BOOL)application:(UIApplication *)application didFinishLaunchingWithOptions:(NSDictionary *)launchOptions- (void)applicationDidEnterBackground:(UIApplication *)application

- (void)applicationWillEnterForeground:(UIApplication *)application

- (void)application:(UIApplication *)application didRegisterForRemoteNotificationsWithDeviceToken:(NSData *)deviceToken

- (void)application:(UIApplication *)application didReceiveRemoteNotification:(NSDictionary *)userInfo fetchCompletionHandler:(void (^ (UIBackgroundFetchResult))completionHandler

-(void)application:(UIApplication *)application performFetchWithCompletionHandler:(void (^ (UIBackgroundFetchResult))completionHandler

- (void)application:(UIApplication *)application didFailToRegisterForRemoteNotificationsWithError:(NSError *)error//For iOS 8 & 9 Support

- (void)application:(UIApplication *)application didRegisterUserNotificationSettings:(UIUserNotificationSettings *)notificationSettings

- (void)application:(UIApplication *)application handleActionWithIdentifier:(NSString *)identifier forRemoteNotification (NSDictionary *)userInfo completionHandler:(void (^)(void))completionHandler

- (void)application:(UIApplication *)application handleActionWithIdentifier:(NSString *)identifier forLocalNotification (UILocalNotification *)notification completionHandler:(void (^)(void))completionHandler

- (void)application:(UIApplication *)application handleActionWithIdentifier:(NSString *)identifier forRemoteNotification (NSDictionary *)userInfo withResponseInfo:(NSDictionary *)responseInfo completionHandler:(void (^)(void))completionHandler

- (void)application:(UIApplication *)application handleActionWithIdentifier:(NSString *)identifier forLocalNotification (UILocalNotification *)notification withResponseInfo:(NSDictionary *)responseInfo completionHandler:(void (^)(void))completionHandler

- (void)application:(UIApplication *)application didReceiveRemoteNotification:(NSDictionary *)userInfo
When using call chaining you must do so for all methods listed above. Failure to do so may prevent the SDK from functioning as intended.
The remainder of this guide assumes your AppDelegate inherits from ICAppDelegate.
Option 2: Use Method Swizzling (applicable for SDK version 2.13.0 and newer)
If you use the 1st option to handle the remote notifications, then you cannot use any other SDK which expects you to use the same subclassing process (because Objective-C and Swift don’t support multiple inheritances). So, to support using multiple SDKs (co-existence) you use the Method Swizzling concept which handles the remote notifications.
You don’t need to subclass anything. You need to call the below method while setting up the core SDK.
[IMIconnect startupWithLaunchOptions:launchOptions error:&error];
Sample Code: Instead of using [IMIconnect startup:&error] method use the below method to enable method swizzling.
[IMIconnect startupWithLaunchOptions:launchOptions error:&error];
Register a device
The user's device must be registered with the Webex Connect platform before other features can be used. To register a device with the platform, create an ICDeviceProfile instance and invoke the IMIconnect.register method.
A device profile must always have a unique device id and user id, if you do not supply a user id then the platform will assign one for you. Typically you will want to supply your own user-id value that corresponds to a user within your backend systems.
The following snippet shows how to create and register a device profile.
if (![IMIconnect isRegistered])
{
  //Instantiate a device profile, this example uses a default device id implementation, but you may use an alternative.
  ICDeviceProfile *deviceProfile = [[ICDeviceProfile alloc] initWithDeviceId:[ICDeviceProfile defaultDeviceId] appUserId:"YOUR_USER_ID"];

  [IMIconnect registerWithDeviceProfile:deviceProfile completionHandler:^(NSDictionary *response, NSError *error)
    {
      if (error == nil)
      {
        //Device was registered successfully
      }
      else
      {
        //Device registration failed, query error for reason information
      }
    }];
}
In a real-world scenario, you will typically want to register with Webex Connect after a user has successfully logged into your app.
If your solution uses provisioned customer profiles (a.k.a master profiles), you will need to call IMIconnect.updateDeviceProfileParam to link the device profile to the customer profile. You may do this after successful device registration.
See here for information on provisioning customer profiles.
Receive messages
Incoming Push and In App messages are received by implementing the ICMessagingDelegate protocol.
The delegate also receives changes to the status of the In-App messaging connection.
#import "ICMessaging.h"
@interface MyMessagingDelegate : NSObject <ICMessagingDelegate>

@end

@implementation MyMessagingDelegate

-(id)init
{
  if (self = [super init])
  {
    [ICMessaging shared].delegate = self;
  }

  return self;
}

- (void)didReceiveMessage:(ICMessage *)message
{
	//Invoked as new messages are received
}

- (void)didChangeConnectionStatus:(ICConnectionStatus)connectionStatus
{
	//Invoked when the status of the In App Messaging connection changes.
}

@end
The remaining steps are only relevant if you wish to use In-App Messaging, otherwise, you may skip to here.
Connect to Webex Connect
To use In-App Messaging you must establish a connection with the Webex Connect platform by invoking the connect method.
NSError *error;

[[ICMessaging shared] connect:&error];

if(error)
{
  NSLog(@"%@",error.localizedDescription);
}
Note
This method will return an error when In-App Messaging is not enabled for the app or a device is not registered with the SDK.
Note
The Time-to-Live (TTL) limit is of 24 hours for In-App and Live Chat messages. Messages undelivered within this period will expire and will not be sent via MQTT or Web Sockets. To avoid loss of undelivered messages, app developers are recommended to implement 'fetch threads' and 'fetch messages' functionality to download these messages from the Server-Side Inbox.
Note that, if Server-Side Inbox is disabled for your app asset, then these messages will be lost if they are not delivered to the customers device within 24 hours.
Listen for connection status events
Events are raised by the SDK whenever the connection status has changed. To receive these events in your application implement the didChangeConnectionStatus method of the ICMessagingDelegate protocol.
#import "ICMessaging.h"
@interface MyMessagingDelegate : NSObject <ICMessagingDelegate>

@end

@implementation MyMessagingDelegate

- (void)didChangeConnectionStatus:(ICConnectionStatus)connectionStatus
{
	//Invoked when the status of the In App Messaging connection changes.
}

@end
Fetch Topics
Webex Connect supports Topic-based messaging, use the fetchTopics method to retrieve a list of topics configured for your application. You can subscribe users, or publish messages, to those topics.
Topics can be configured by an Admin user within the Webex Connect portal.
[[ICMessaging shared] fetchTopics:offset completionHandler:^(NSArray *topics, BOOL hasMoreTopics, NSError *error){
  if (error)  {
    //Failed to fetch topics
  }
  else  {
    //Topics fetched successfully
  }
}
];
Subscribe to a topic
Invoke the subscribe method to subscribe the current user to a topic.
[[ICMessaging shared] subscribeTopic:topicId completionHandler:^(NSError *error){
  if (error)  {
    //Failed to subscribe to topic
  }
  else  {
    //Topic subscription successful
  }
}
];
Unsubscribe from a topic
Invoke the unsubscribeTopic method to unsubscribe the current user from a topic.
[[ICMessaging shared] unsubscribeTopic:topicId completionHandler:^(NSError *error){
  if (error)  {
    //Failed to unsubscribe from topic
  }
  else  {
    //Unsubscribe from topic successful
  }
}
];
Create a thread
All In-App Messages within Webex Connect are grouped by threads. In order to publish messages, you must first create an ICThread object.
When responding to an incoming message, you can obtain the ICThread directly from the incoming message.
ICThread *newThread = [ICThread new];
newThread.title = @“This is a new thread”;

[[ICMessaging shared] createThread:newThread
                     completionHandler:^(ICThread *thread, NSError *error)
{
  if (thread == nil)
  {
    NSLog(@“Error when creating a thread”,error.description);
  }
  else
  {
    NSLog(@“A thread has been created with the threadId: %@”,thread.threadId);
  }
}];
Publish a message
Invoke publishMessage to publish a message to Webex Connect .
ICMessage * icMessage = [ICMessage new];
icMessage.message = @ "My message";
icMessage.thread = thread;

[[ICMessaging shared] publishMessage: icMessage
    completionHandler: ^ (NSError * error)
{
  if (error)
  {
    NSLog(@ "Publication failed. Reason: %@", error.localizedDescription);
  }
  else
  {
    NSLog(@ "Publication succeeded.");
  }
}];
Disconnect from Webex Connect
This method is used to disconnect from Webex Connect. Once disconnected, incoming In-App messages will not be received.
NSError * error;
[[ICMessaging shared] disconnect: & error];

if (error)
{
  NSLog(@ "Disconnection failed. Reason: %@", error.localizedDescription);
}
else
{
  NSLog(@ "Disconnection succeeded.");
}
Conclusion
Now you have completed your app integration with Webex Connect. Once you build your app and distribute, your app users can send and receive messages.
Rich Notification Support
This section is only required if you intend to use rich notifications.
Rich notifications allow media, such as large images, to be displayed within the notification center.
Add Dependencies
- Drag-drop the
IMIconnectNotificationServiceExtension.xcframeworkfile into your XCode project. - Select Create groups and Copy if needed in the prompt that appears.
- Click your project within the navigator and select your App Target. Click the General tab and add the
IMIconnectNotificationServiceExtension.xcframeworkto the Framework, Libraries, and Embedded Content section and select Embed & Sign for Embed value.

- Under the Signing & Capabilities tab, add "Keychain Sharing" capability, and add a Keychain Group key (com..). Use your application bundleIdentifier for the Unique key.
- Replicate the same for the extension target. Ensure that the Keychain Group key is the same for both - the app and the extension.

Keychain Sharing
Create an App Group
- From the Apple Developer Portal, click Certificates, Identifiers, and Profiles.
- In the Identifiers section, select App Groups; click on the '+' button.

Add App Groups
- Enter details in the fields - description of the group and unique identifier. Click Continue.

Register an App Group
- Click Register and Done.

Confirm App Group
Create a Notification Service Extension
- Within XCode, click your project within the Project Navigator.
- Within the Targets section, click the '+' button.

Add Target
- Within the Application Extension section, select Notification Service Extension and click Next.

Notification Service Extension
- Enter a name and click Finish.
- Click Activate.

Activate Push Notification Service Extension
- You should now see a new folder in your project hierarchy containing three new files -
NotificationService.h, NotificationService.m, and Info.plist.

Folder Hierarchy
- Click your project within the Project Navigator.
- Select your notification service extension target.
- Click the Signing & Capabilities tab.
- Add the App Groups Capability and select app group that you created earlier.
Repeat steps 9 and 10 for your main application target.

Select Notification Service Extension Target
- Select the Build Phases tab for the Notification Service Extension and in the Link Binary with Libraries section, add IMIconnectNotificationServiceExtension.xcframework.

Link Binary with Libraries
- Remove the default code that was generated for NotificationService, leave only the class definition.
- Change your NotificationService to inherit from ICNotificationService.
//Within NotificationService.h

#import <UserNotifications/UserNotifications.h>

#import <IMIconnectNotificationServiceExtension/IMIconnectNotificationServiceExtension.h>

@interface NotificationService : ICNotificationService

@end


//Within NotifcationService.m
#import "NotificationService.h"

@interface NotificationService ()


@end

@implementation NotificationService


@end
import UserNotifications

class NotificationService: ICNotificationService
{

}
- If you have added IMIconnectConfiguration.plist:
a. Add a new key: groupIdentifier and add the group identifier of the project.
b. Add this file to your Notification Service Extension target.

Add New Key

Add File to Notification Service Extension target
- If you are not using IMIconnectConfiguration.plist open NotificationService.m and override the getter to return your app group identifier.
#import "NotificationService.h"

@implementation NotificationService
- (NSString *)groupIdentifier
{
return @"<Your app group identifier>";
}

@end
Updated 2 months ago