
Android SDK Quickstart Guide
The Webex Connect Android SDK provides a messaging framework that enables app developers to integrate Webex Connect's In-App and Push messaging services within their mobile applications.
Optional monitoring of device attributes allows change events to be reported back to the Webex Connect platform and values stored against the customer’s profile. These events may then be used to enrich user engagement through the triggering of rules and flows to send messages that may be more relevant to the user.
This guide will take you through all the steps that are required to integrate the Webex Connect Android SDK within an application.
Prerequisites
The minimum requirements to use the Webex Connect SDK are:
| Component | Requirement |
|---|---|
| Android Operating System | Android OS 4.2 (API 17) and higher. |
| Software | Latest version of Android Studio Webex Connect Android SDK |
| Accounts | A valid Google account. An active Webex Connect account. |
OS Version Support
| SDK Version | Min Supported OS | TLS Support |
|---|---|---|
| 2.15.0 and higher | Android OS 4.2 (API 17) and higher | TLS 1.0 - Android OS 4.2.x - 4.4 (API 17 - 19) TLS 1.1 / 1.2 - Android OS 5.0+ (API 20+) |
| 2.12.0 and higher | Android OS 4.1.x (API 16) and higher. | TLS 1.0 - Android OS 4.1.x - 4.4 (API 16 - 19) TLS 1.1 / 1.2 - Android OS 5.0+ (API 20+) |
| 2.11.1 and lower | Android OS 4.0.x (API 15) and higher. | TLS 1.0 - Android OS 4.1.x - 4.4 (API 16 - 19) TLS 1.1 / 1.2 - Android OS 5.0+ (API 20+) |
Configuration Tasks
To use the Webex Connect SDK within your application follow these tasks in sequence:
Integrate Firebase
The Webex Connect SDK leverages Firebase Cloud Messaging for its push capability. Please follow the official Firebase setup guide, which will take you through the process of configuring a Firebase project, adding Gradle dependencies and google-services.json to your Android Studio project.
Important!
If you use the Firebase Assistant, only follow steps 1 & 2, the SDK takes care of the rest, no additional code is required.
Firebase version support
Webex Connect SDK 2.10.0 supports Firebase versions 11.0.0 and higher.
Webex Connect SDK versions lower than 2.10.0 support Firebase versions 11.0.0 through 15.0.2.
Capture the Firebase Service Account JSON File
The Firebase Cloud Messaging server key allows Webex Connect to submit push notifications to your application. The following steps will provide directions for obtaining the key, please make a note of the key for use later in this guide.
- Open the Firebase Console
- Click the Firebase project to open it. (You created this in the previous section)
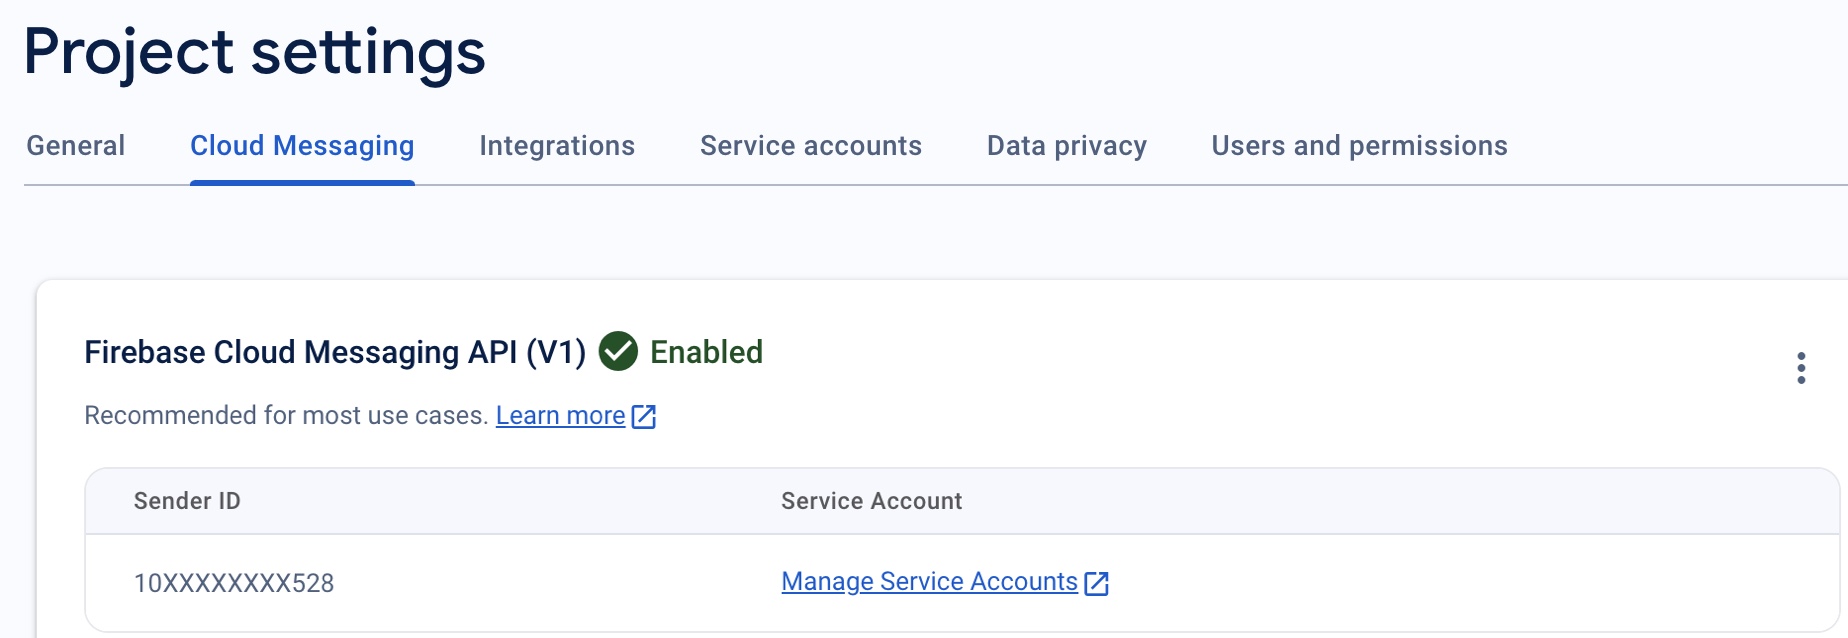
- Ensure Firebase Cloud Messaging API (V1) is enabled: The Firebase Cloud Messaging API (V1) is enabled by default for all the newly created projects. Hence, you can skip the step. However, for existing Firebase projects, you must have Cloud Messaging API (V1) enabled.

To check, click the Settings icon next to "Project Overview" in the top left of the left-hand menu and select Project settings. Select the "Cloud Messaging" tab.
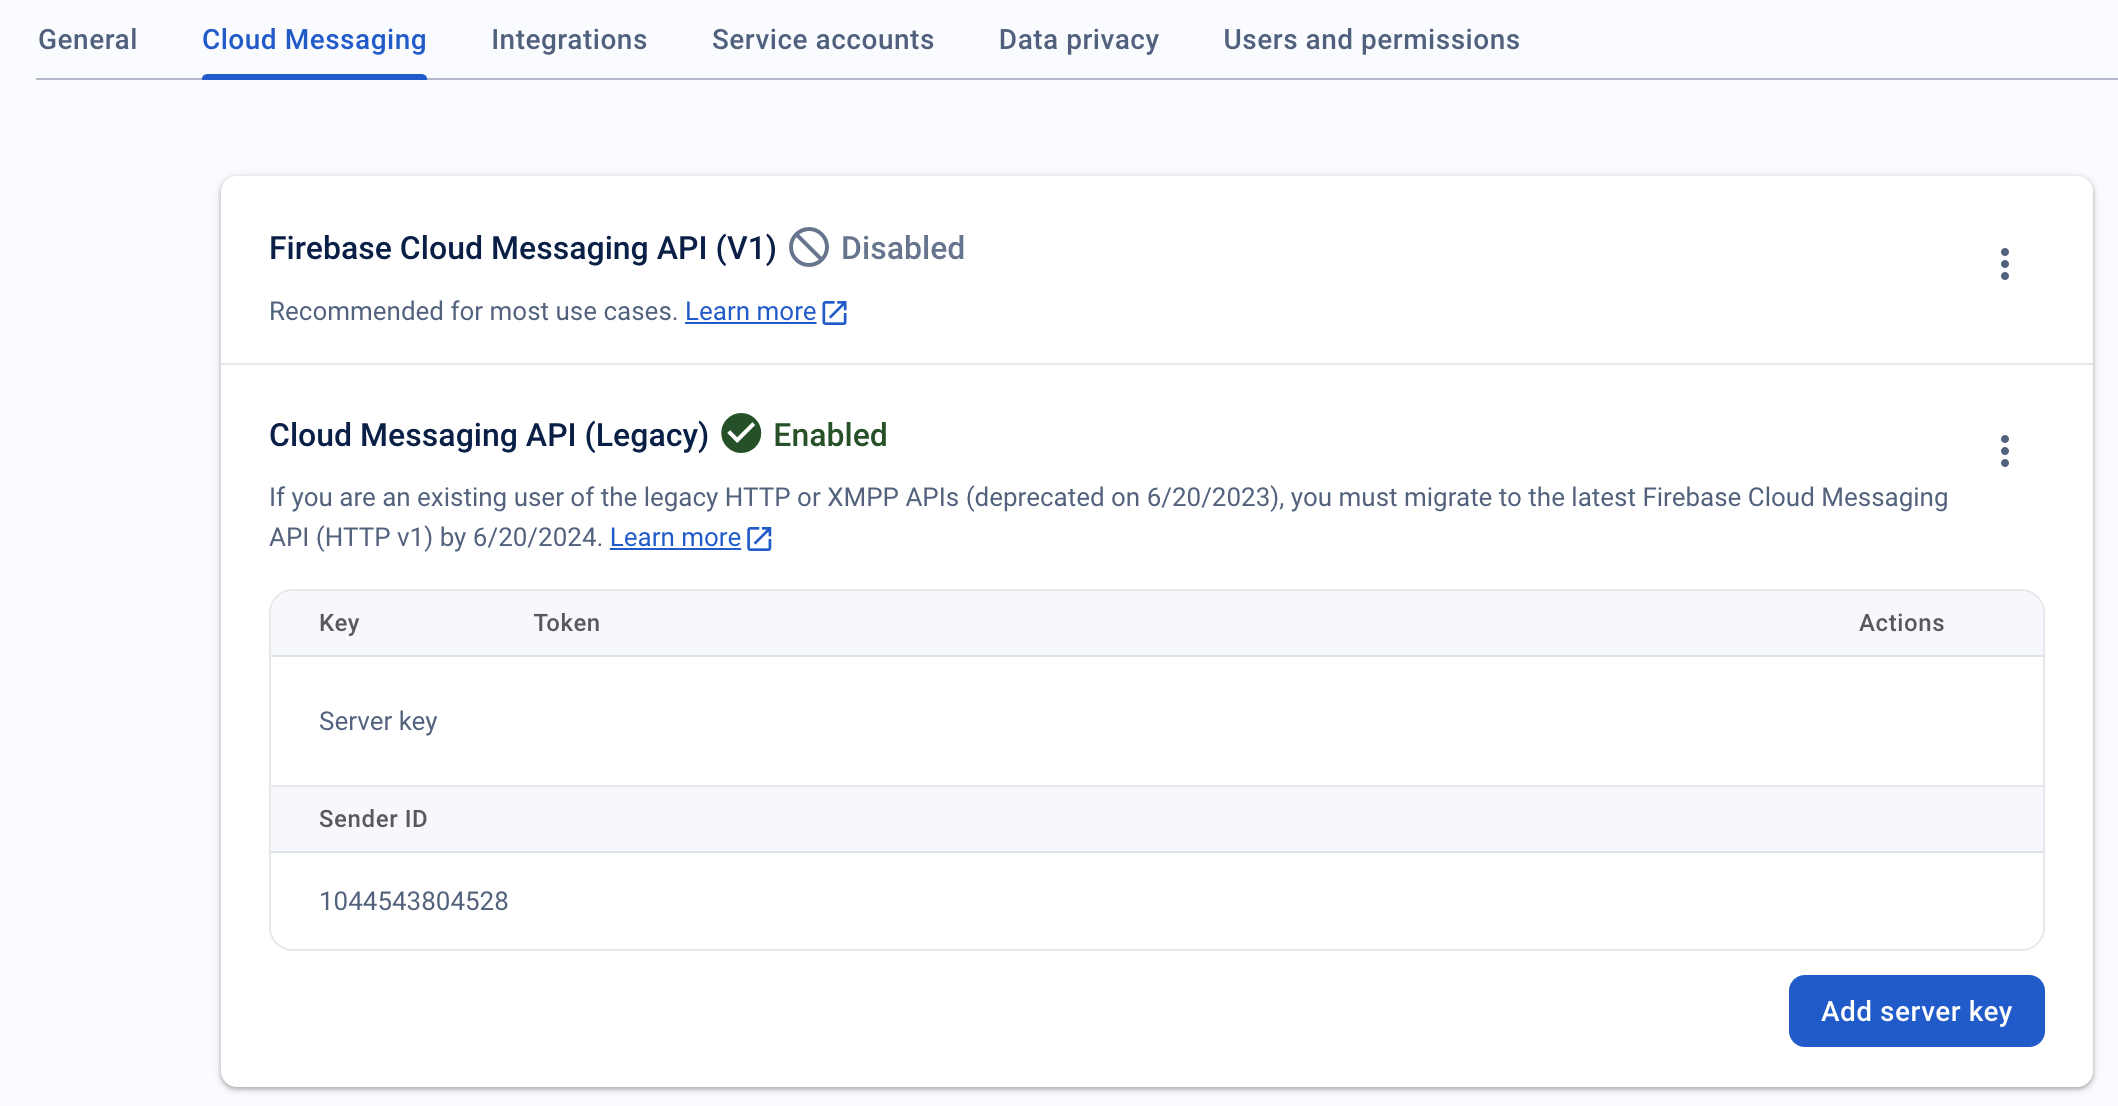
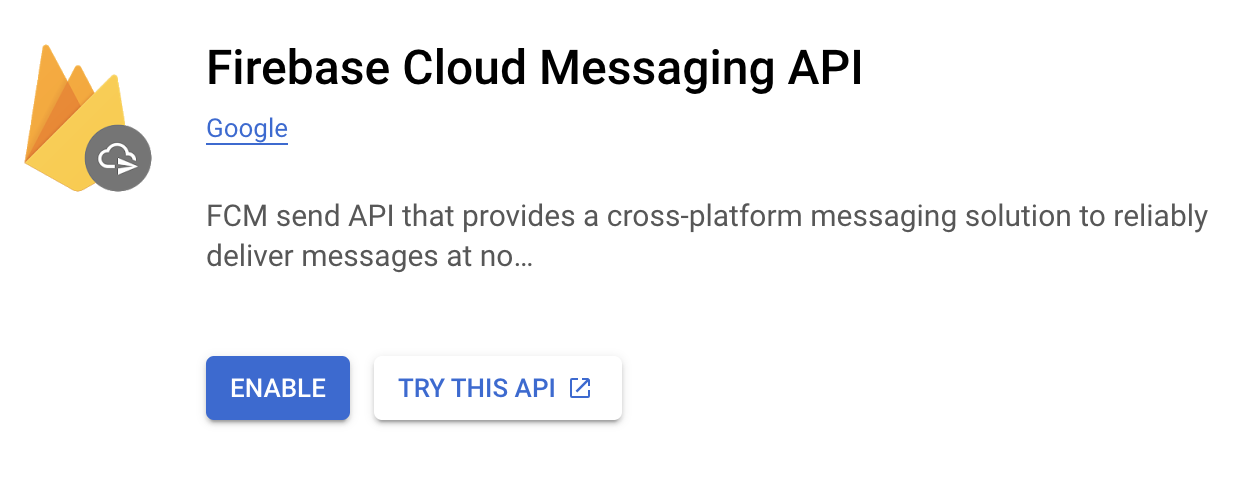
If it is disabled, click the More icon (three dots) and click Enable on the Product Details page. It may take a few minutes for the process to complete.
-
Click the Settings icon next to "Project Overview" in the top left of the left-hand menu and select Project settings.
-
Click Service accounts tab.

-
Click Generate new private key, under the Admin SDK configuration snippet.
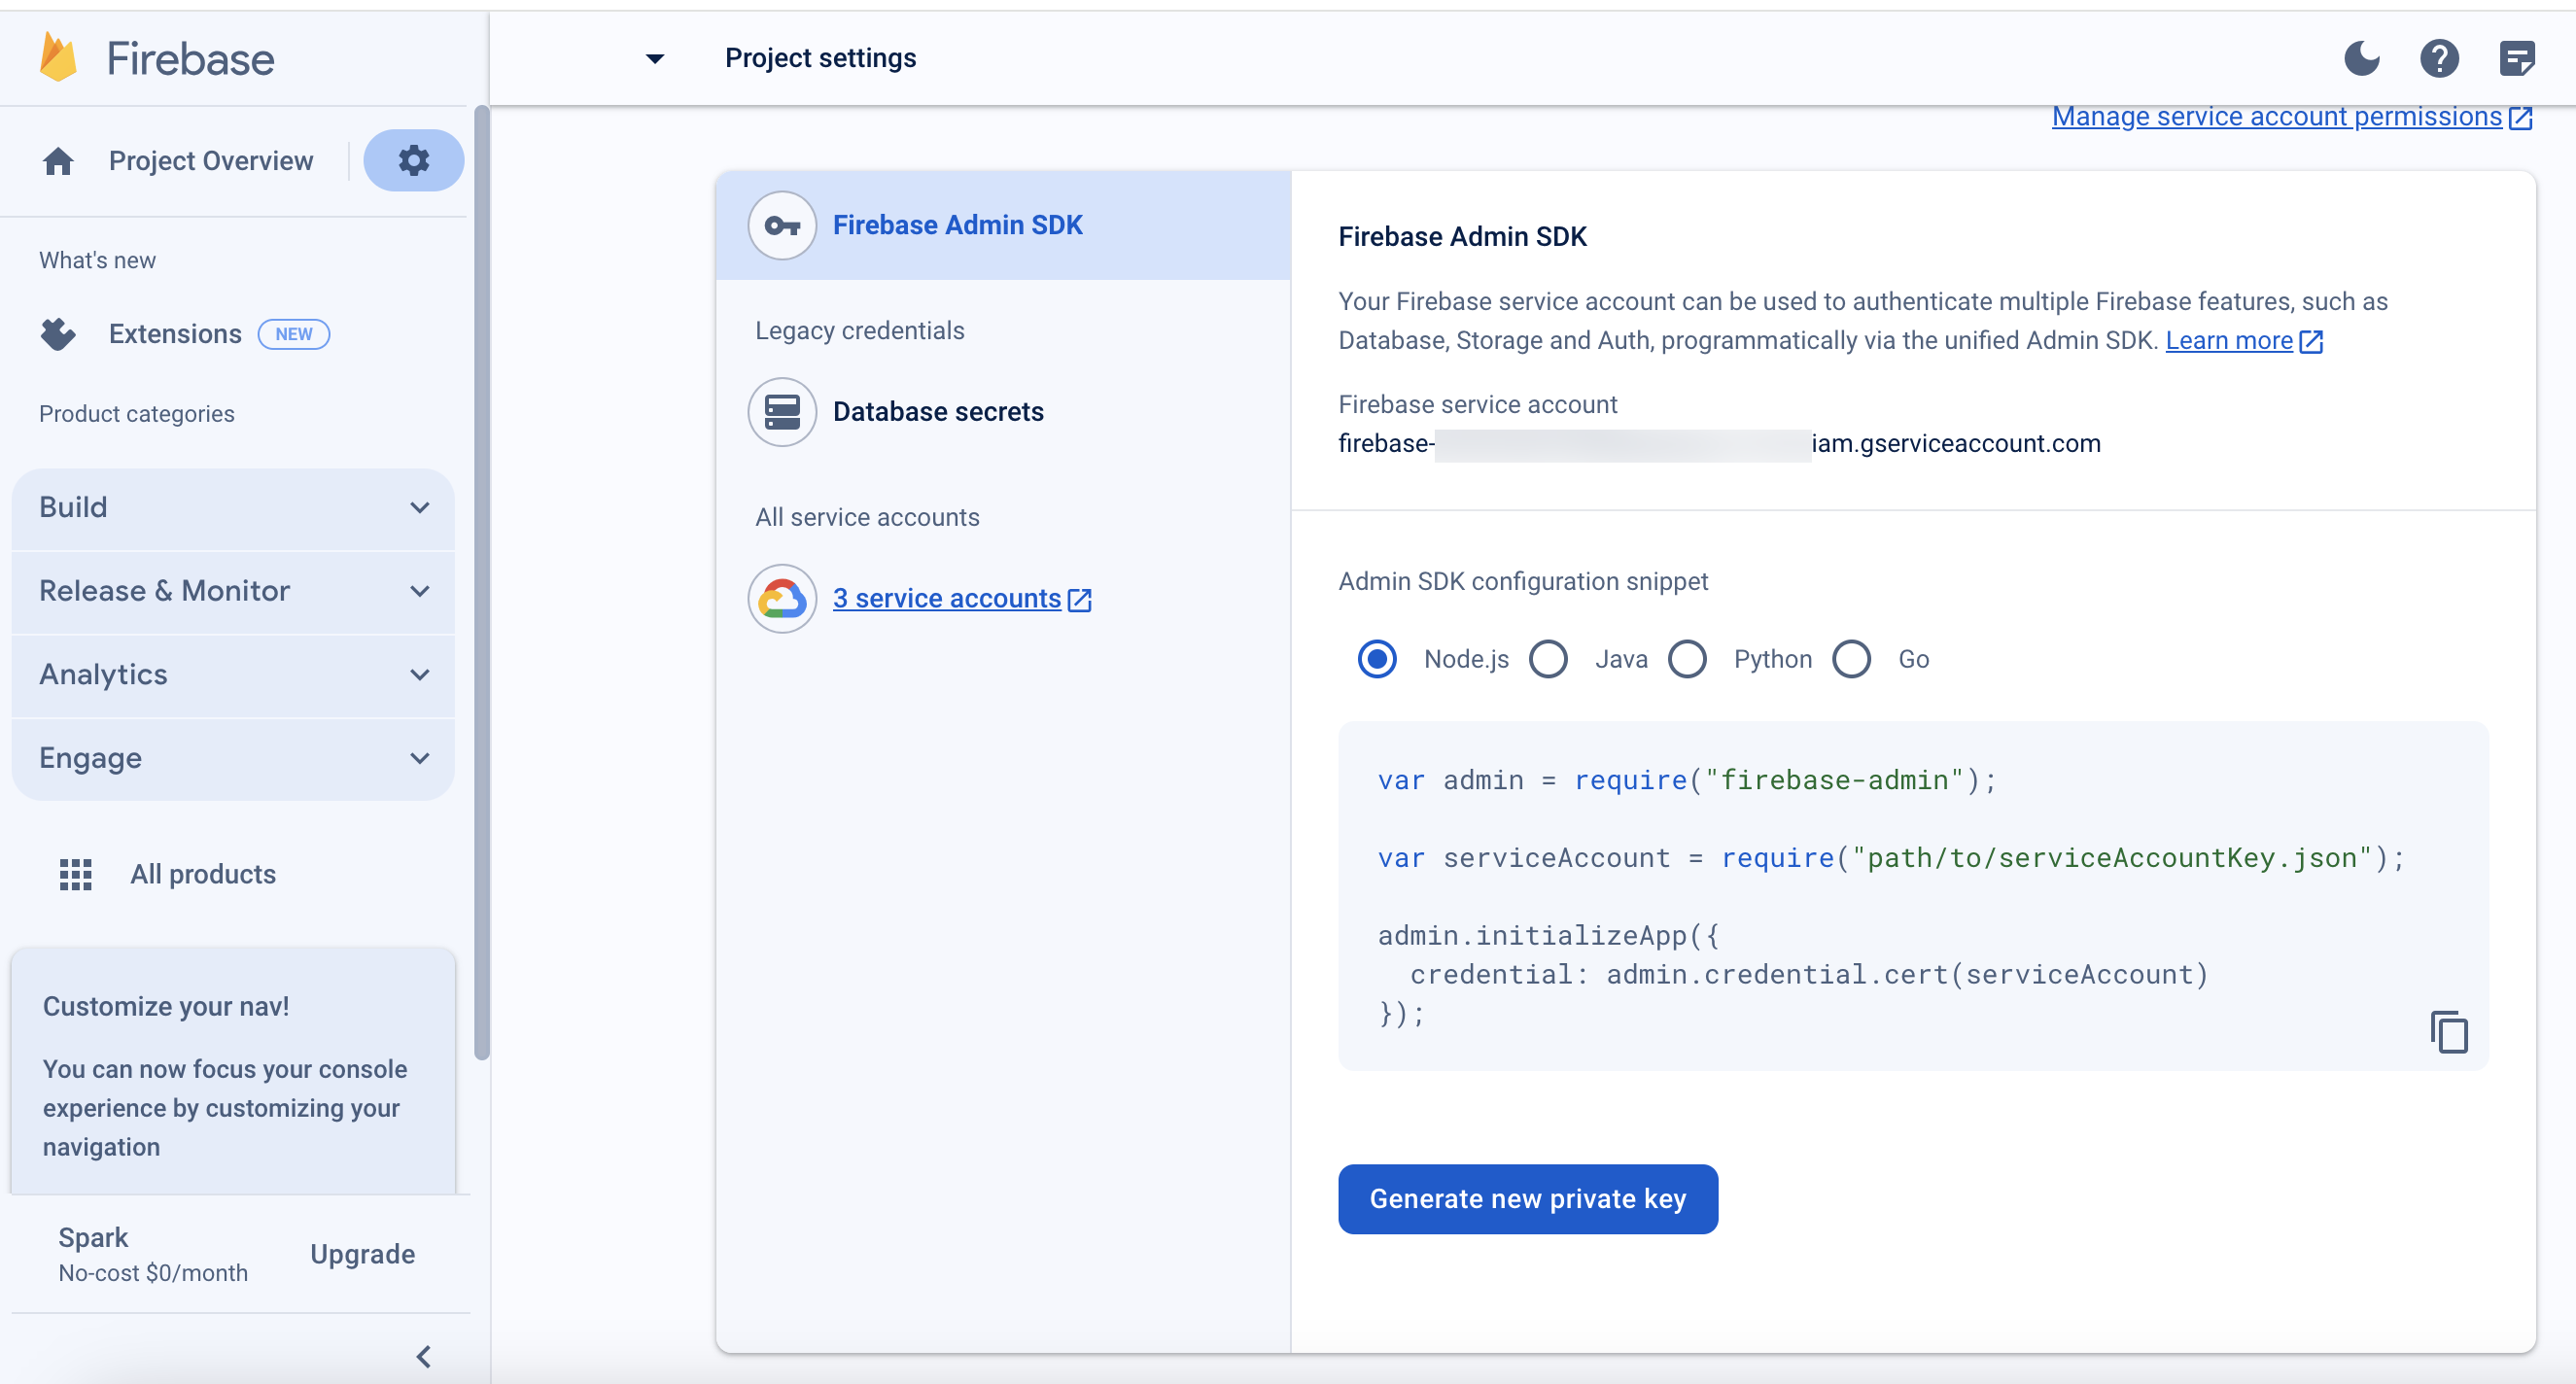
A warning message appears as shown below.
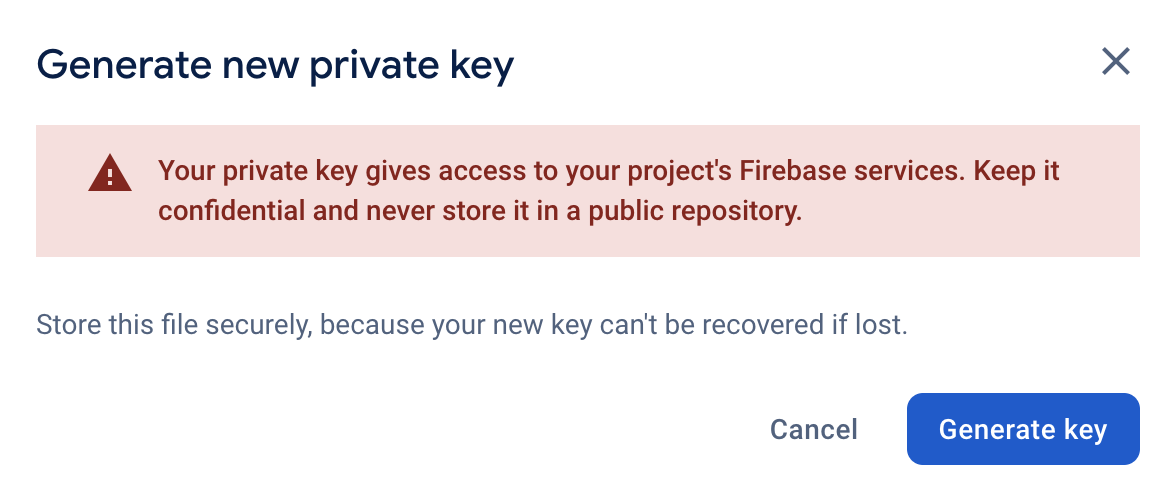
- Click Generate Key. A JSON file will be downloaded.
Note: Do not edit the downloaded JSON file. This is needed within the next section.
Integrate HMS
Note
If you do not need to support Huawei devices that do not have access to Google Play Services, you can safely skip this section and continue to Configure a Mobile App Asset.
Currently, we only support EMUI versions 10.x and above
Some Huawei devices do not have access to Google Play Services and therefore do not support Firebase. For these devices the Webex Connect SDK supports integration with Huawei Mobile Services (HMS). Please follow the official Huawei Integration guide to go through the process of configuring app information in AppGallery Connect, adding Gradle dependencies and agconnect-services.json to your Android Studio project.
Capture the Huawei App ID and App secret
Huawei Mobile Services (HMS) App ID and App secret allow Webex Connect to submit push notifications to your application. The following steps will guide you through enabling push and obtaining the App ID and App secret.
- Sign in to AppGallery Connect.
- Go to My projects and select the app you want to configure with Webex Connect.
- Enable Push Kit by following Huawei’s documentation.

- Make a note of the App ID and App secret (This is needed within the next section).

Configure a Mobile App Asset
Your application must be added to your Webex Connect tenant as an App Asset. The steps are different depending on which version of Webex Connect you use.
Webex Connect v5 and above tutorial: Create a mobile app asset in Webex Connect.
Webex Connect v4 tutorial: Create a mobile app asset in Webex Connect
How to determine your Webex Connect version
To determine which version of Webex Connect you are using, please login to your tenant and expand the menu bar by clicking the double arrow at the bottom left of the screen, your version number will be displayed in the expanded view. If you do not have an expandable menu bar then you are using v4.
Import the SDK
Note
We currently support importing of the SDK via a dependency manager such as Maven central.
This section outlines the steps to integrate the Connect SDK into your Android application. You can import the SDK using two different methods.
Method 1: Importing via Maven Central
- Open your Android Studio project.
- Add the following line within the dependencies section of your app build.gradle.
dependencies {
implementation 'com.webex.connect:core-gms-full:2.20.1'
} // Use the appropriate version
dependencies {
implementation 'com.webex.connect:core-gms-lite:2.20.1'
} // Use the appropriate version
dependencies {
implementation 'com.webex.connect:core-hms-full:2.20.1'
} // Use the appropriate version
dependencies {
implementation 'com.webex.connect:core-hms-lite:2.20.1'
} // Use the appropriate version
Method 2: Integrating manually by downloading the Core SDK.
- Click here to navigate to the GitHub repository. Once you're in the GitHub repository, proceed to the Releases section, and always ensure to choose the latest release. Under the Assets section, you can find the necessary files.
- Download the Android Core SDK. As we have different flavours of SDKs, please download the required SDK (FCM Full/Lite or HMS Full/Lite). To learn more about the SDK flavours, click here.
- Download the Android Core SDK.
- Unzip the SDK.
- Copy the IMIconnectCore.aar file to your app module libs folder.
- Open your Android Studio project.
- Add the following line within the dependencies section of your app build.gradle.
dependencies {
    //...
    implementation files('IMIconnectCore.aar')
    //...
}
Code Integration
Follow the below steps to integrate Webex Connect Android SDK in your application:
a. Configure Android Gradle
b. Configure Android Manifest
c. Add IMIconnectConfig.properties file
d. Configure Proguard Rules
e. Initialize the SDK
f. Register a Device
a. Configure Android Gradle
In your project level build.gradle add the following entries:
buildscript {
  repositories {
    // ...
    maven {url 'https://maven.google.com/'}
  }
  dependencies {
    // ...
    classpath 'com.google.gms:google-services:4.3.10’ }
  }
  allprojects {
    repositories {
      // ...
      maven {url 'https://maven.google.com/'}
  }
}
buildscript {
  repositories {
    // ... // Configure the Maven repository address for the HMS Core SDK.
    maven {url 'https://developer.huawei.com/repo/'}
  }
  dependencies {
    // ... // For HMS // Add the AppGallery Connect plugin configuration.
    classpath 'com.huawei.agconnect:agcp:1.4.2.300' }
}
allprojects {
  repositories {
    // ... // For HMS // Configure the Maven repository address for the HMS Core SDK.
    maven {url 'https://developer.huawei.com/repo/'}
  }
}
In your app/build.gradle, add the following entries:
Note
When integrating an SDK via Maven Central, dependencies will be automatically managed, eliminating the need to add them explicitly.
app/build.gradle
apply plugin: 'com.android.application'
apply plugin: 'com.google.gms.google-services'
android {
  // ...
}
dependencies {
  // ...
  implementation "androidx.sqlite:sqlite:2.1.0"
  implementation "androidx.work:work-runtime:2.7.0"
  implementation "androidx.constraintlayout:constraintlayout:2.1.4"
  implementation "com.squareup.picasso:picasso:2.5.2"
  implementation "net.zetetic:android-database-sqlcipher:4.4.3@aar"
  implementation "com.google.firebase:firebase-messaging:23.1.0"
  implementation "com.google.android.gms:play-services-base:18.1.0"
  implementation "com.google.android.gms:play-services-location:21.0.0"
  implementation "androidx.core:core:1.10.1"
}
app/build.gradle
apply plugin: 'com.android.application'
apply plugin: 'com.huawei.agconnect'
android {
  // ...
}
dependencies {
  // ...
  implementation "androidx.sqlite:sqlite:2.1.0"
  implementation "androidx.work:work-runtime:2.7.0"
  implementation "androidx.constraintlayout:constraintlayout:2.1.4"
  implementation "com.squareup.picasso:picasso:2.5.2"
  implementation "net.zetetic:android-database-sqlcipher:4.4.3@aar"
  implementation "androidx.core:core:1.10.1"
  // HMS dependency
  implementation "com.huawei.hms:push:6.5.0.300"
}
b. Configure Android Manifest
In your project, open AndroidManifest.xml and add the content below.
<!-- OPTIONAL Add the server domain from IMIconnect -->

<meta-data android:name="serverdomain" android:value="Your IMIconnect’s domain" />
For the SDK to function correctly, you must add the correct permissions to your app manifest. Some permissions are optional and need only be included if you use specific features, please refer to the comments below for further details.
<!-- PERMISSIONS -->
<!-- REQUIRED for connecting to imiconnect -->
<uses-permission android:name="android.permission.WAKE_LOCK"/>
<uses-permission android:name="android.permission.RECEIVE_BOOT_COMPLETED"/>
<!-- OPTIONAL add this permission if you wish to capture IMSI and IMEI details -->
<uses-permission android:name="android.permission.READ_PHONE_STATE"/>
<!-- OPTIONAL add this permission if you wish to monitor network attributes -->
<uses-permission android:name="android.permission.ACCESS_NETWORK_STATE"/>
<!-- OPTIONAL add this permission if you wish to monitor account attributes such as email-->
<uses-permission android:name="android.permission.GET_ACCOUNTS"/>
<!-- OPTIONAL add this permission if you wish to monitor location and/or cell id changes -->
<uses-permission android:name="android.permission.ACCESS_COARSE_LOCATION" />
<!-- OPTIONAL add this permission if you wish to monitor location changes to a fine degree of accuracy -->
<uses-permission android:name="android.permission.ACCESS_FINE_LOCATION" />
<!-- Replace YOUR_APPLICATION_CLASS_NAME with the name of your actual class that derives from the Application class. Do not worry if you do not already use an Application subclass in your project, we will create one later in this guide -->
<application
   android:name="YOUR_APPLICATION_CLASS_NAME"
   android:allowBackup="true"
   android:label="@string/app_name"
   android:theme="@style/AppTheme">
   <activity
       android:name="YOUR_ACTIVITY_NAME"
       android:label="@string/app_name">
       <intent-filter>
           <!-- OPTIONAL Include this section if you wish to use deeplinks -->
           <data
               android:host="command"
               android:scheme="@string/app_id"/>
           <category android:name="android.intent.category.DEFAULT"/>
           <category android:name="android.intent.category.BROWSABLE"/>
           <action android:name="android.intent.action.MAIN"/>
           <category android:name="android.intent.category.LAUNCHER"/>
       </intent-filter>
   </activity>
   <receiver
       android:name="com.imimobile.connect.core.messaging.ICMessagingReceiver"
       android:enabled="true"
       android:exported="false"
             android:permission="com.imimobile.connect.core.permission.PUSH_PERMISSION">
       <intent-filter>
           <action android:name="com.imimobile.connect.core.rtmevent"/>
           <action android:name="com.imimobile.connect.core.notification.click"/>
           <action android:name="com.imimobile.connect.core.intent.notification.RECEIVE"/>
       </intent-filter>
   </receiver>

</application>
c. Add IMIconnectConfig.properties file.
IMIconnectConfig.properties file.The IMIconnectConfig.properties file contains mandatory asset information as such the app id and client key which is used to authenticate with the Webex Connect platform.
Download the file from the Webex Connect asset configuration page and place within your application asset directory.
For example, to download the IMIconnectConfig.properties file:

Sample content:
# MANDATORY The App ID that is generated by IMIconnect for your application
appId=<APP_ID>
# MANDATORY The Client Key that is generated by IMIconnect for your application
clientKey=<CLIENT_KEY>
# OPTIONAL Add the IMIconnect's server environment, by default is AWS UK
environment=
# OPTIONAL Add the server domain to override zero-rating domain
serverDomain=
# OPTIONAL Add the allowUnencryptedDatabaseFallback to allow creating a default SQLite database when SQLcipher fails, by default is false.
allowUnencryptedDatabaseFallback=true
shouldRequestNotificationPermission=true
#OPTIONAL To enable the push notification permission requested on registration.
d. Configure Proguard Rules
Add the below rule in proguard-rules.pro file.
Note
If you use an obfuscation tool other than ProGuard, please refer to the tool providers documentation for configuring equivalent rules.
-dontwarn org.eclipse.jetty.**
-dontwarn com.google.firebase.messaging.FirebaseMessaging
-dontwarn javax.servlet.**
-dontwarn org.slf4j.**

# for sqlcipher
-keep class net.sqlcipher.** { *; }
-keep class net.sqlcipher.database.* { *; }

# WorkManager
-keep class * extends androidx.work.Worker
-keep class * extends androidx.work.InputMerger
-keep public class * extends androidx.work.ListenableWorker {
  public <init>(...);
}
-keep class androidx.work.WorkerParameters

# For MQTT
-keep class org.eclipse.paho.client.mqttv3.** {*;}
-keep class org.eclipse.paho.android.service.** { *; }
-keepclasseswithmembers class org.eclipse.paho.** {*;}
For HMS :

-dontwarn org.eclipse.jetty.**
-dontwarn javax.servlet.**
-dontwarn org.slf4j.**

# for sqlcipher
-keep class net.sqlcipher.** { *; }
-keep class net.sqlcipher.database.* { *; }

# WorkManager
-keep class * extends androidx.work.Worker
-keep class * extends androidx.work.InputMerger
-keep public class * extends androidx.work.ListenableWorker {
  public <init>(...);
}
-keep class androidx.work.WorkerParameters

#Proguard rules for HMS
-ignorewarnings -keepattributes *Annotation*
-keepattributes Exceptions
-keepattributes InnerClasses
-keepattributes Signature
-keepattributes SourceFile,LineNumberTable
-keep class com.hianalytics.android.**{*;}
-keep class com.huawei.updatesdk.**{*;}
-keep class com.huawei.hms.**{*;}

# For MQTT
-keep class org.eclipse.paho.client.mqttv3.** {*;}
-keep class org.eclipse.paho.android.service.** { *; }
-keepclasseswithmembers class org.eclipse.paho.** {*;}
e. Initialize the SDK
The SDK must be initialized before attempting to use any of its features. Initialization must occur from your Application.onCreate method, if your app does not have an Application class you must create one.
Note
Ensure you use the same name for your Application class as specified in your AndroidManifest.xml
public class MyApplication extends Application
{
    @Override
    public void onCreate()
    {
        super.onCreate();

        // Initialize the imiconnect SDK
        try
        {
            IMIconnect.startup(this);
        } catch (ICException e)
        {
            e.printStackTrace();
        }
    }
}
Registering Notification channel for Android O and above
Starting in Android 8.0 (API level 26), all notifications must be assigned to a channel or they will not be displayed.
Channels allow users greater control over their notifications. Users may disable specific channels or control the visual and auditory options for each channel directly from the Android system settings app. Users may also long-press a notification to change behaviors for the associated channel.
//Sample code to register Notification channel:

if (Build.VERSION.SDK_INT >= Build.VERSION_CODES.O)
{
  // Provide your channel name & description that will be visible to the user. These will need configuring in your strings.xml
  String name = getString(R.string.channel_name);
  String description = getString(R.string.channel_description);

  // A channel registered with the id of ICConstants.DEFAULT_CHANNEL_ID is required as a minimum
  NotificationChannel channel = new NotificationChannel(ICConstants.DEFAULT_CHANNEL_ID, name, NotificationManager.IMPORTANCE_DEFAULT);

  channel.setDescription(description);

  // Register the channel with the system
  NotificationManager notificationManager = (NotificationManager) getSystemService(Context.NOTIFICATION_SERVICE);

  notificationManager.createNotificationChannel(channel);
}
f. Register a device
The user's device must be registered with the Webex Connect platform before other features can be used. To register a device, create an ICDeviceProfile instance and invoke the IMIconnect.register method.
A device profile must always have a unique device id and user id, if you do not supply a user id then the platform will assign one for you. Typically you will want to supply your own user-id value that corresponds to a user within your backend systems.
IMIconnect.register(new ICDeviceProfile(ICDeviceProfile.getDefaultDeviceId()), new ICRegistrationCallback()
{
   @Override
   public void onRegistrationComplete(final Bundle bundle, final ICException exception)
   {
     if (exception != null)
     {
       Log.e("Registration", "Registration failed! Reason:" + exception.toString());
     }
     else
     {
       Log.d("Registration", "Registration succeeded!");
     }
   }
});
IMIconnect.register(new ICDeviceProfile(ICDeviceProfile.getDefaultDeviceId(),enteredUserId), new ICRegistrationCallback()
{
   @Override
   public void onRegistrationComplete(final Bundle bundle, final ICException exception)
   {
     if (exception != null)
     {
       Log.e("Registration", "Registration failed! Reason:" + exception.toString());
     }
     else
     {
       Log.d("Registration", "Registration succeeded!");
     }
   }
});
ICDeviceProfile provides a convenience device id implementation that is based on Secure.ANDROID_ID, but you are free to supply your own value instead if you wish.
Integration of the Webex Connect SDK is now complete and your application is ready to receive push notifications!
Updated 2 months ago