Quickstart Guide for SDK Lite
This Quickstart guide explains the necessary steps required to integrate the Cordova plugin into your Android app using SDK Lite. It also provides the steps to set-up an app asset corresponding to your app on the imiconnect platform.
Prerequisites
- npm and Node
- A Cordova App
- An Active imiconnect account
- An imiconnect App Asset
- imiconnect Cordova Plugin
Android Specific
iOS Specific
- Mac OS
- iOS 9 or higher
- Xcode 8 or higher
- Active Apple developer account
- APNS or Firebase Project
Jetpack / AndroidX
This plugin requires modern Jetpack libraries (AndroidX). If the application includes plugins that are still on the old Android Support libraries, you will face build issues. The quickest way to work around the issue is to install cordova-plugin-androidx and cordova-plugin-androidx-adapter, which will automatically enable Jetpack and migrate plugins in the application:
cordova plugin add cordova-plugin-androidx-adapter cordova plugin add cordova-plugin-androidx
Add imiconnect Cordova Plugin
Run the following command in your terminal to add the imiconnect Cordova Plugin to your app project:
$ cordova plugin add
eg: $ cordova plugin add IMIconnectPlugin
Project Set-Up
For iOS App Development
- Open the workspace file (
../platforms/ios/MyApp.xcworkspace) in Xcode. - After opening the workspace file, Make sure the MyApp project is selected in the left panel.
- Create a p12 file. Follow this link.
- After creating the p12 file, in Application, switch on the PushNotifications from the Capabilities tab on the main window.

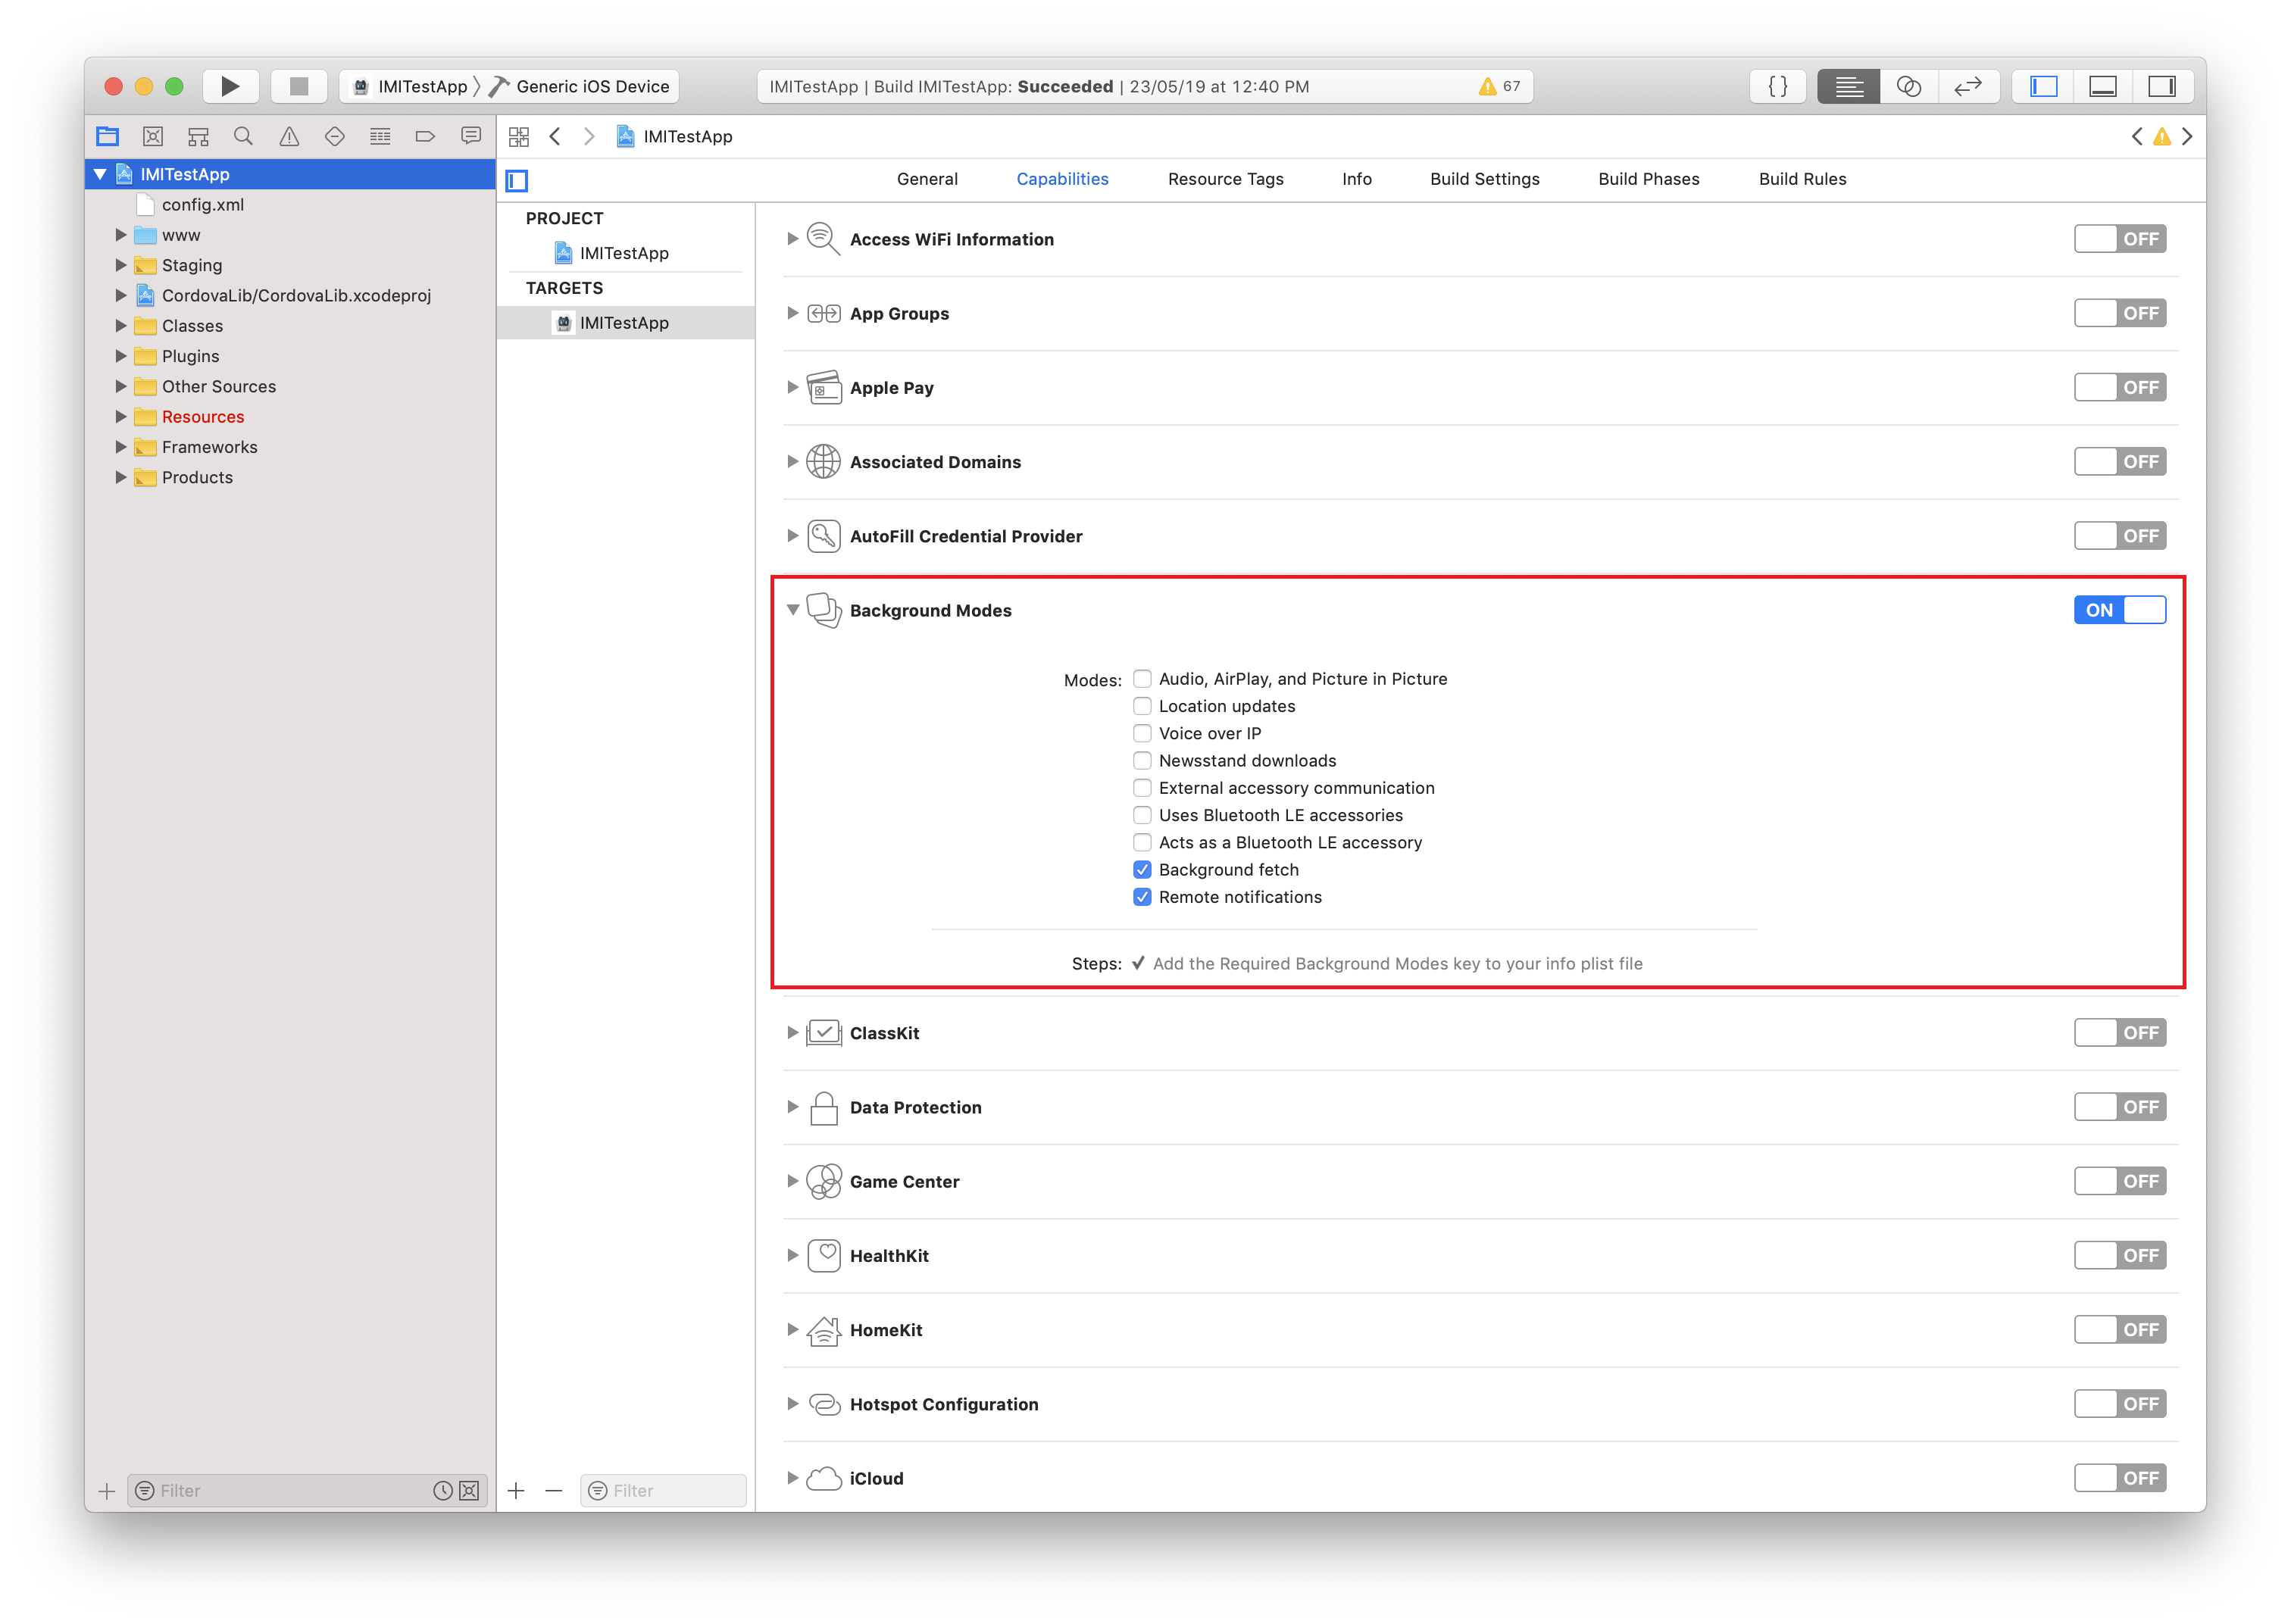
- Switch ON the Background Modes, and select Remote notifications on the Capabilities tab.
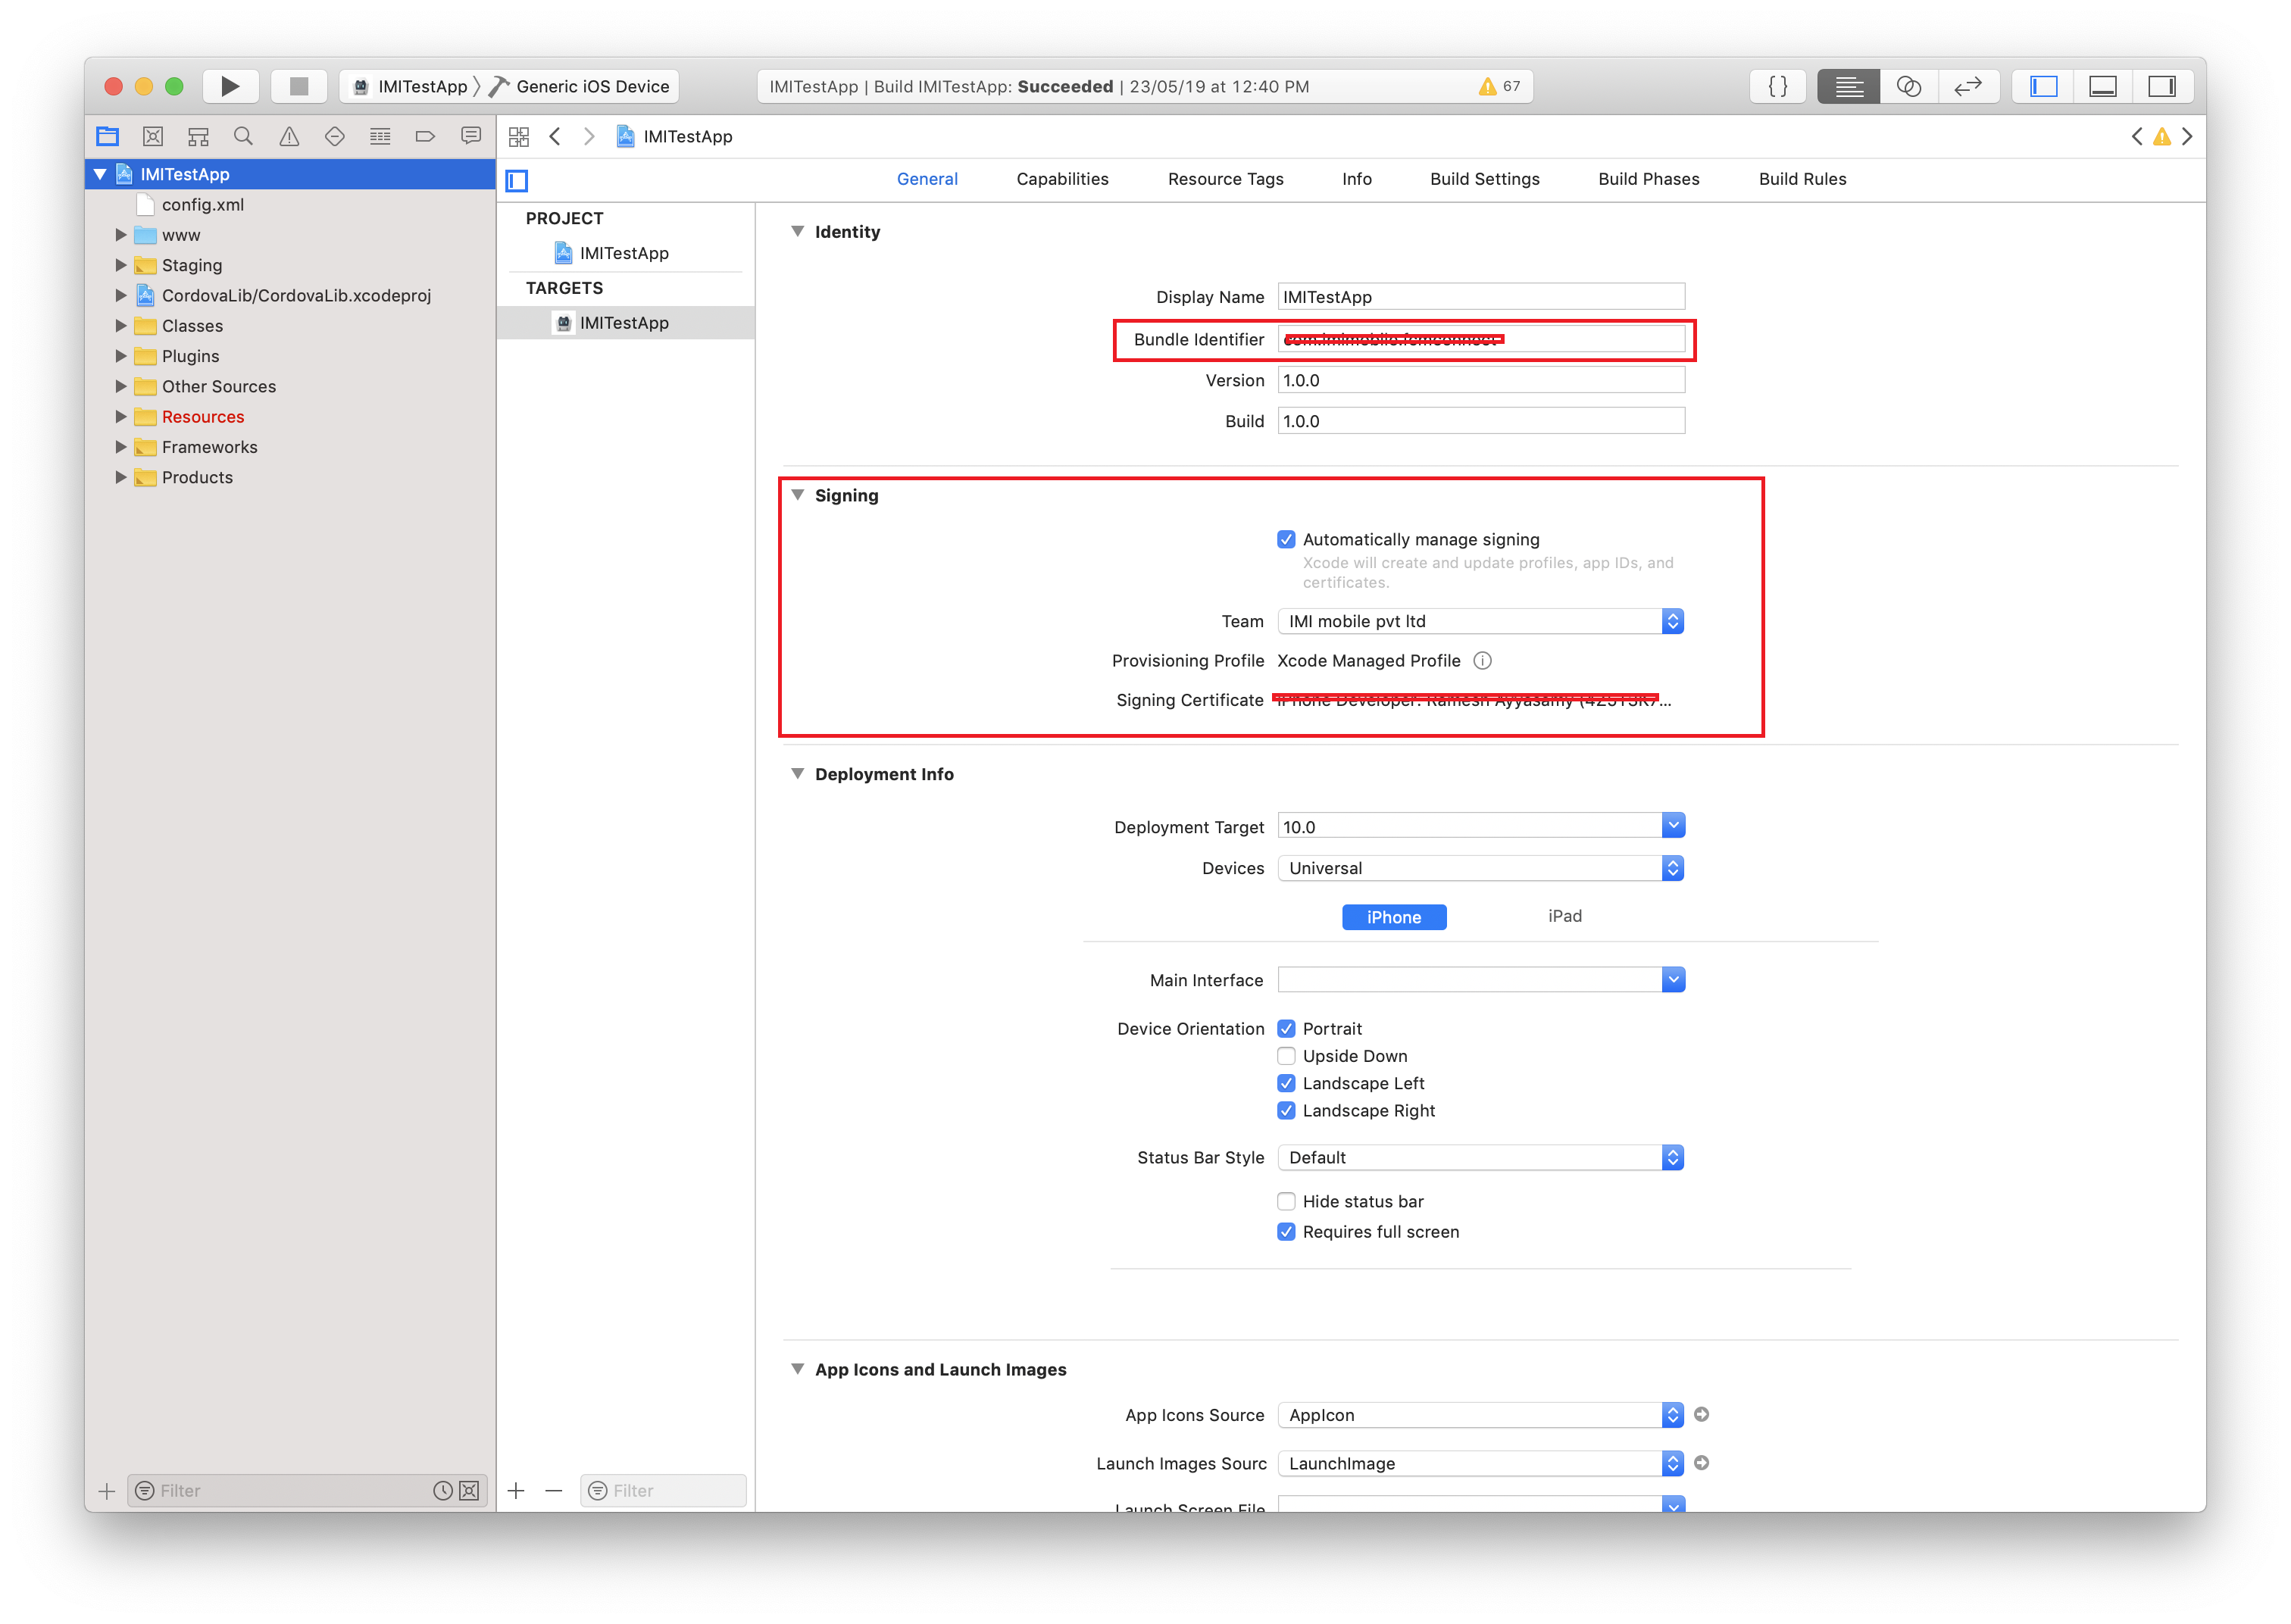
- On the main window, select General tab and provide the Bundle Identifier (you can change this as per your requirement) and Signing Details.
- Set the status of the following frameworks as optional in the Linked Frameworks and Libraries section on the General tab:
FileProvider.FrameworkUserNotificationUI.frameworkUserNotifications.frameworkIMIconnectNotificationServiceExtension.framework
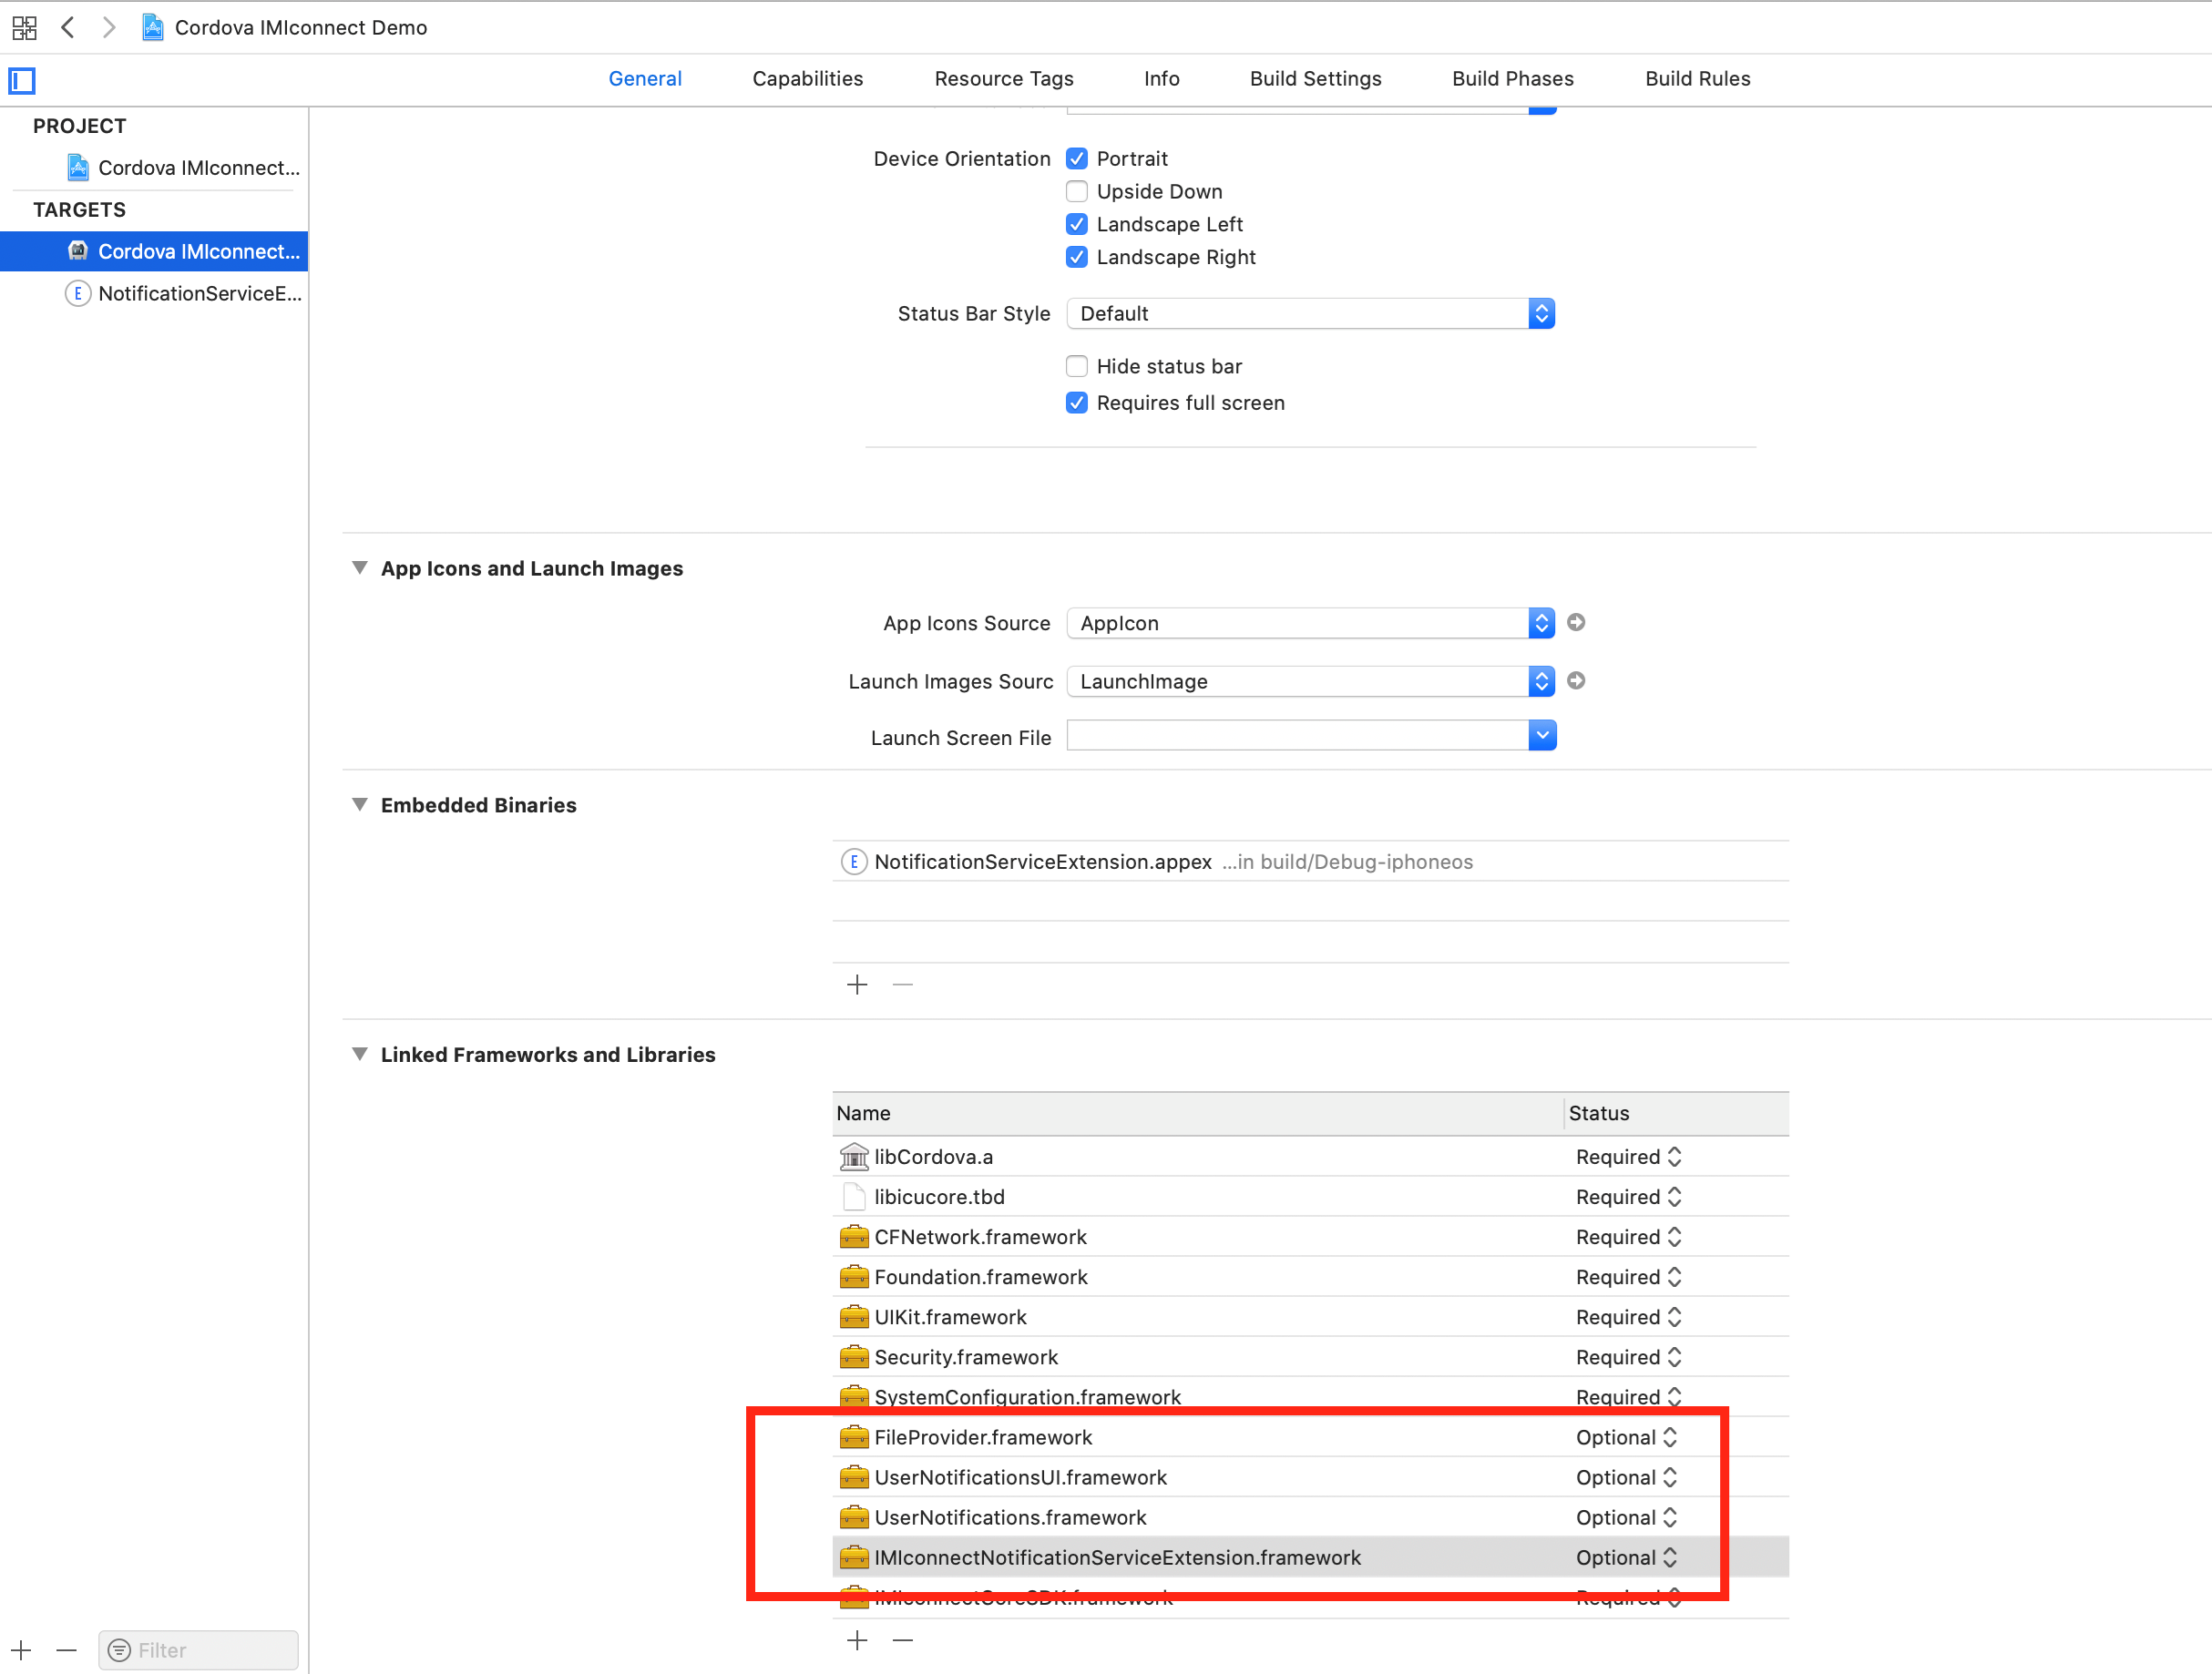
Linked Frameworks and Libraries for Cordova Plug-in Lite
- Remove
IMIconnectCoreSDK.frameworkandIMIconnectNotificationServiceExtension.frameworkfrom the Linked Frameworks and Libraries section , and add them to Embedded Binaries.
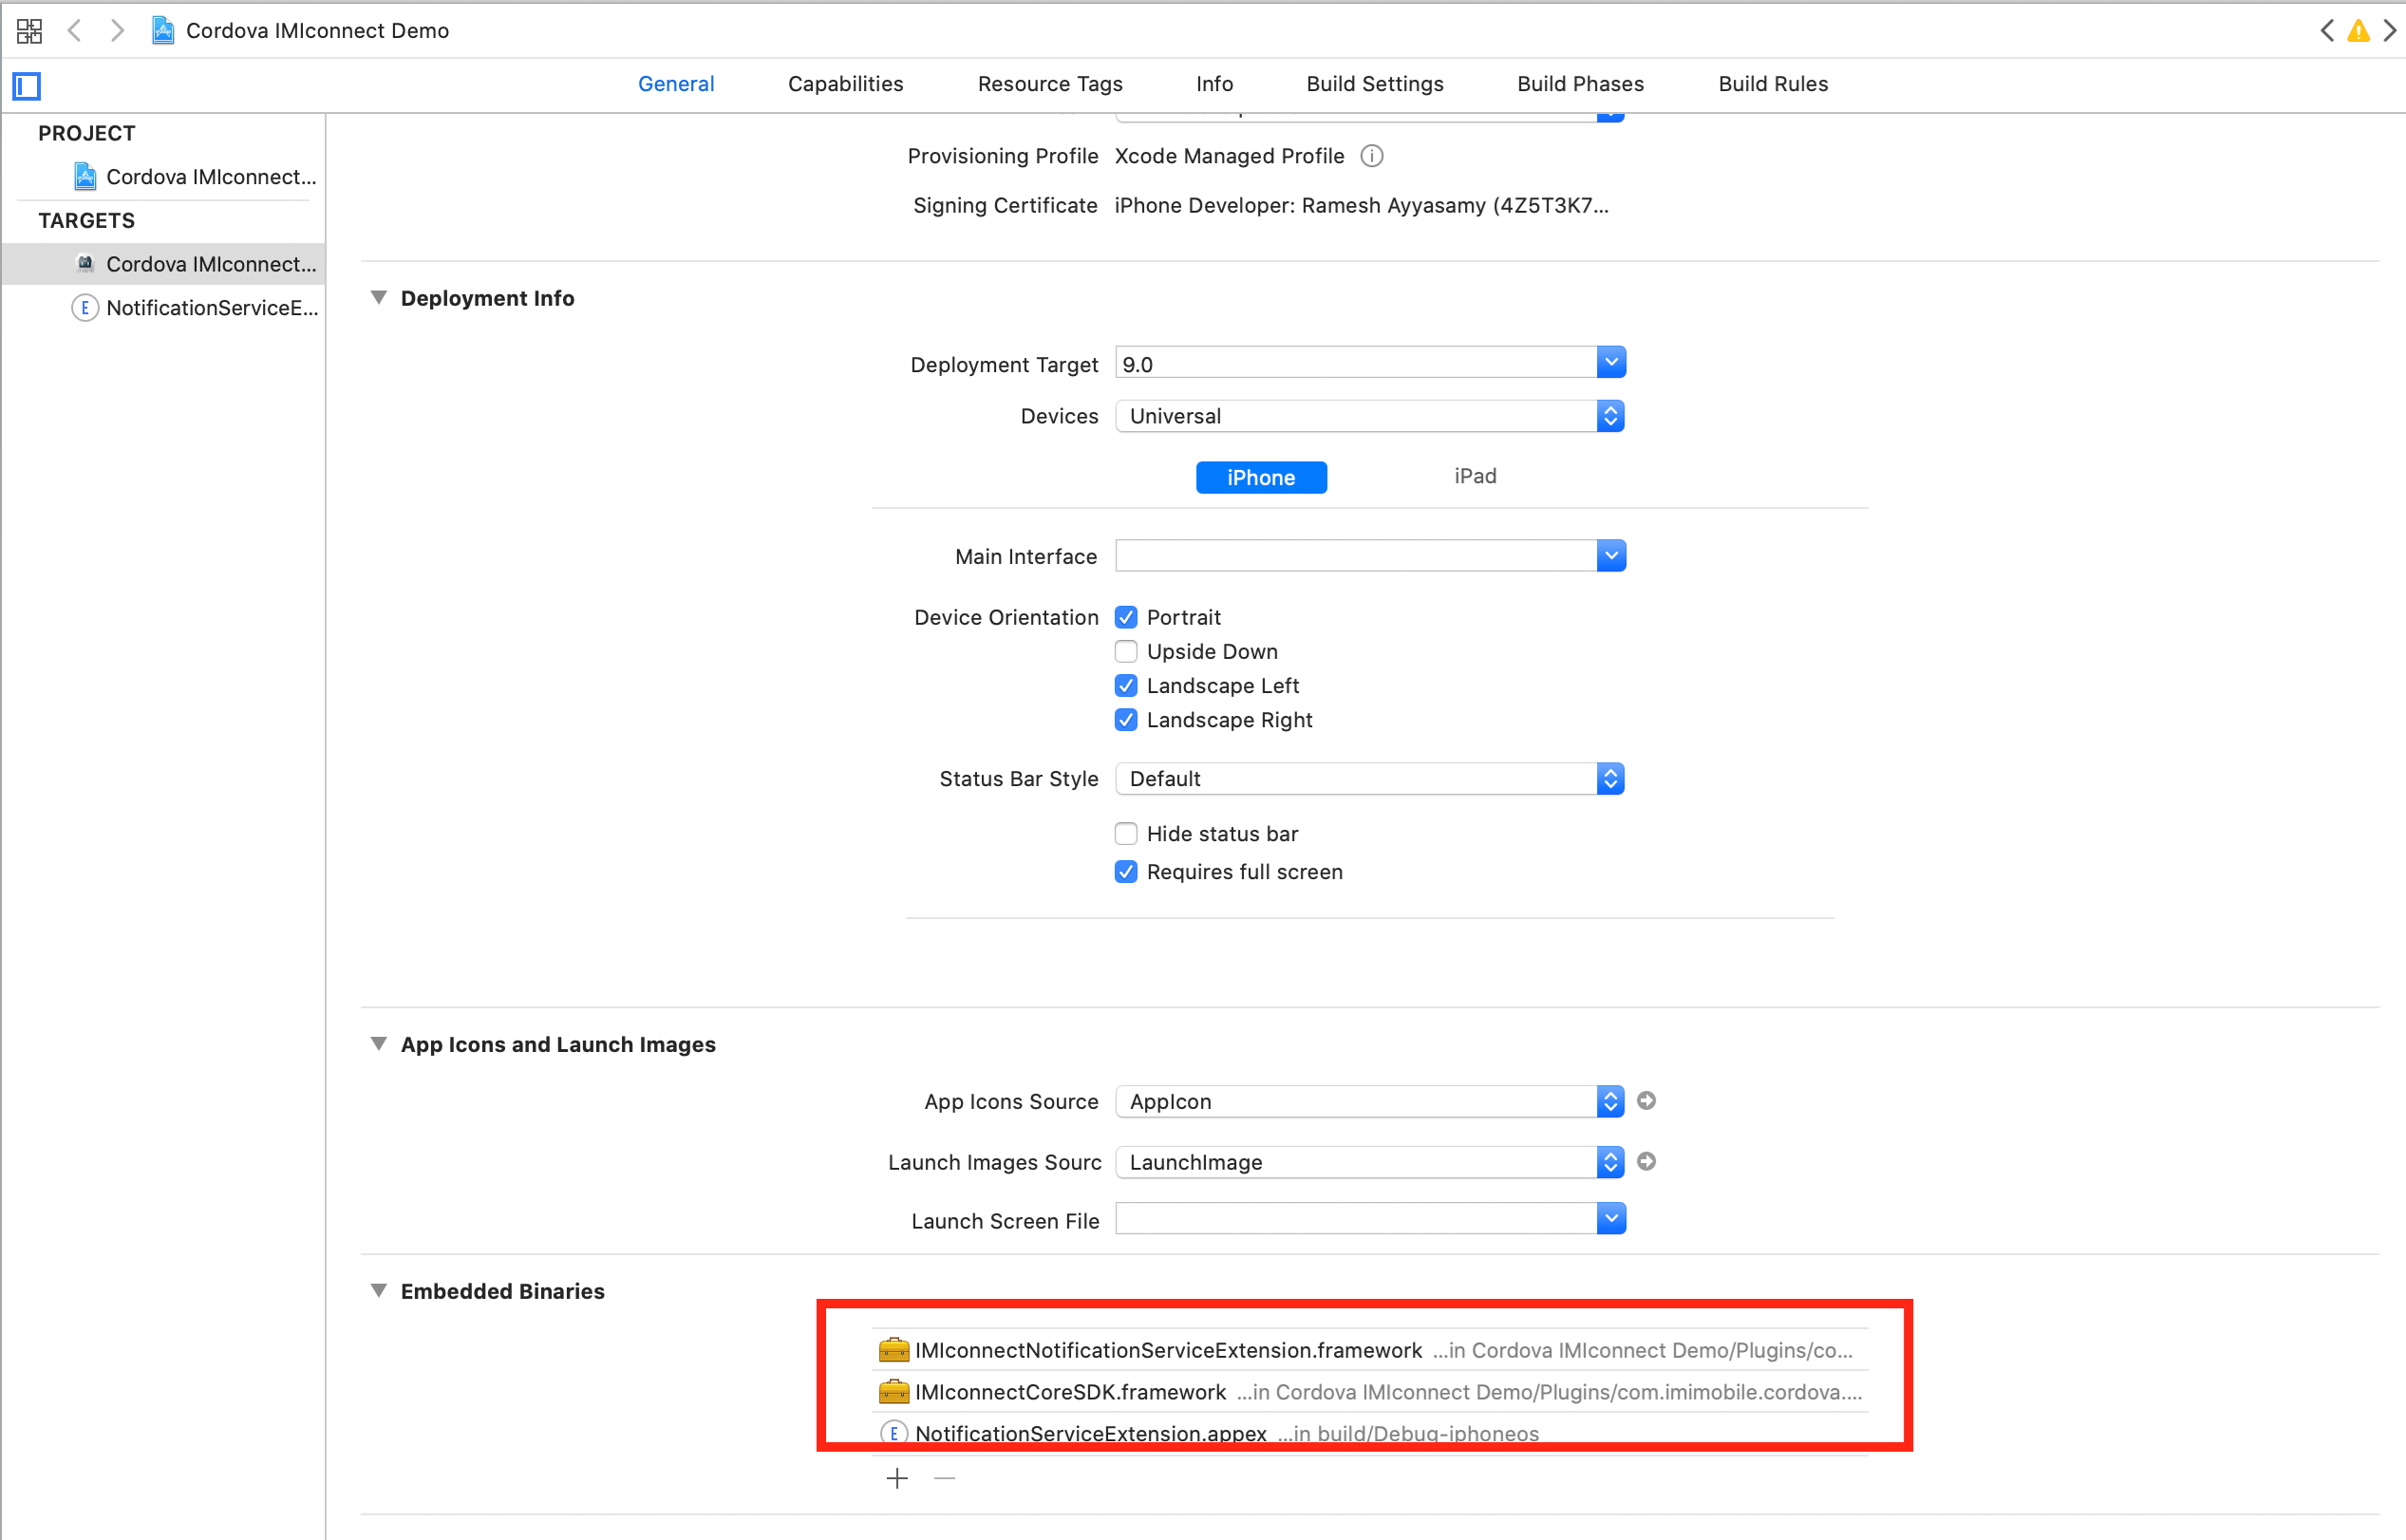
Embedded Binaries for Cordova Plug-in Lite
- Click the "(+)" icon available on target section and add NotificationService Extension to receive Rich Push Notifications.
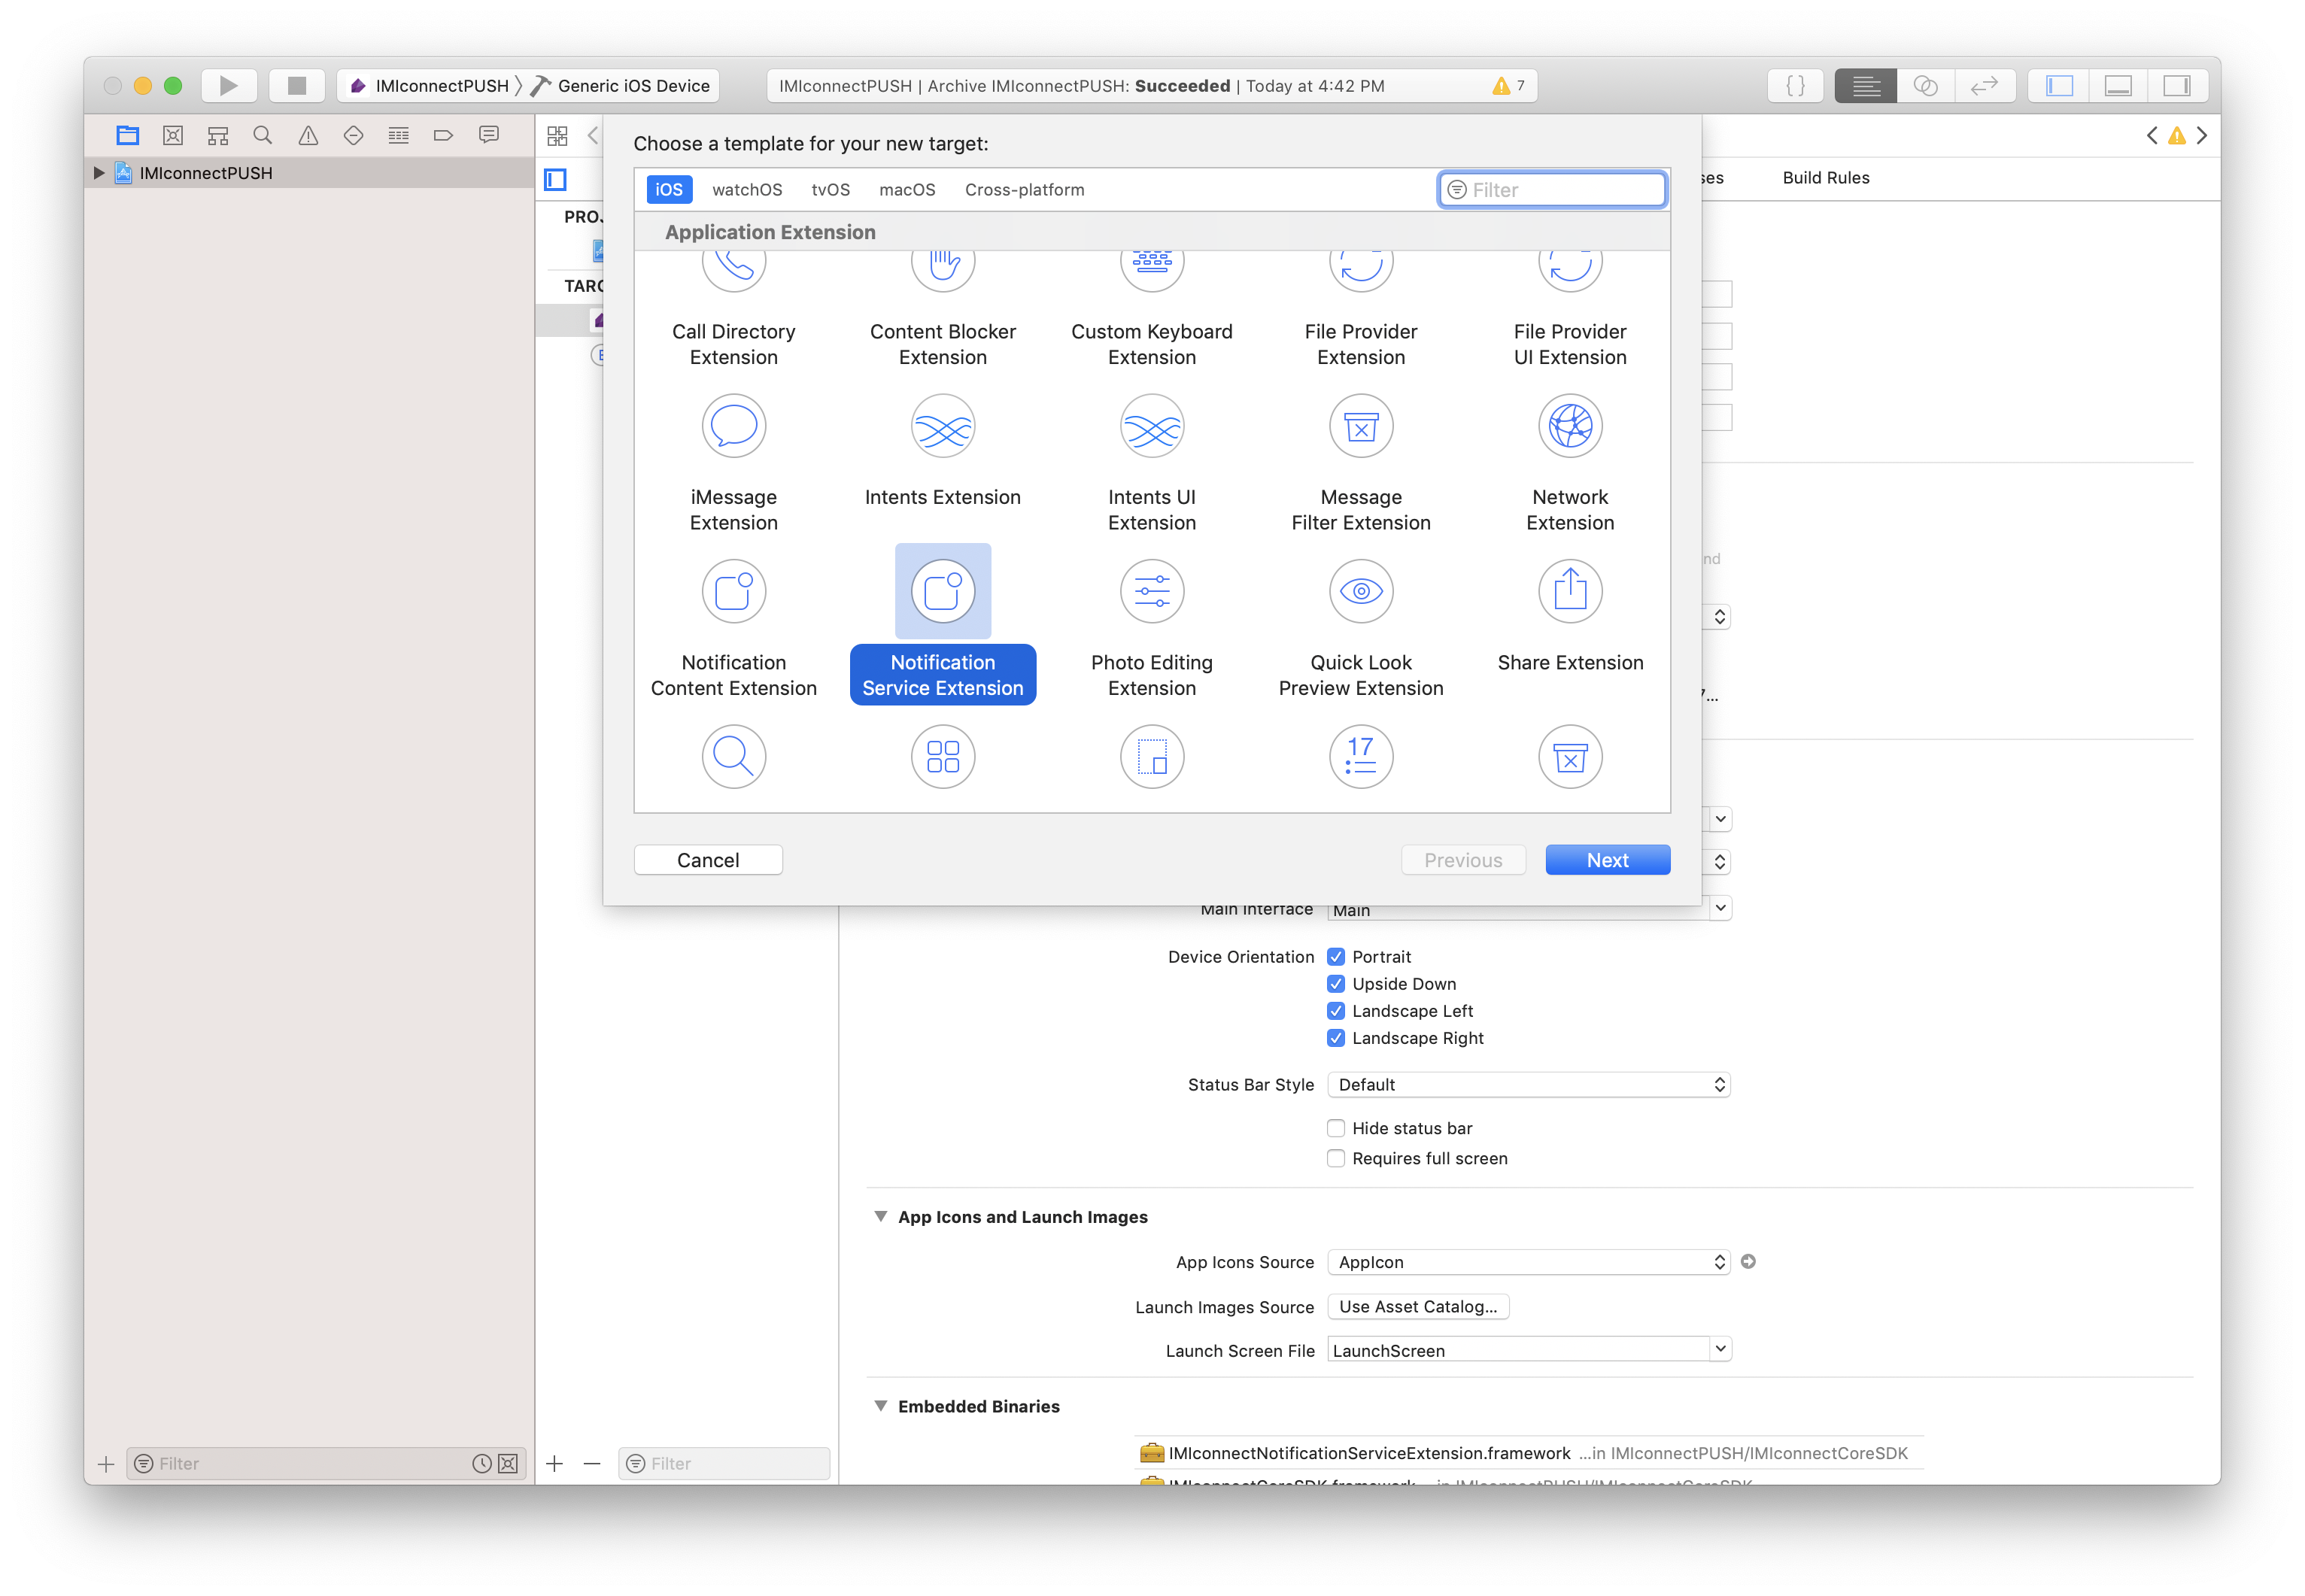
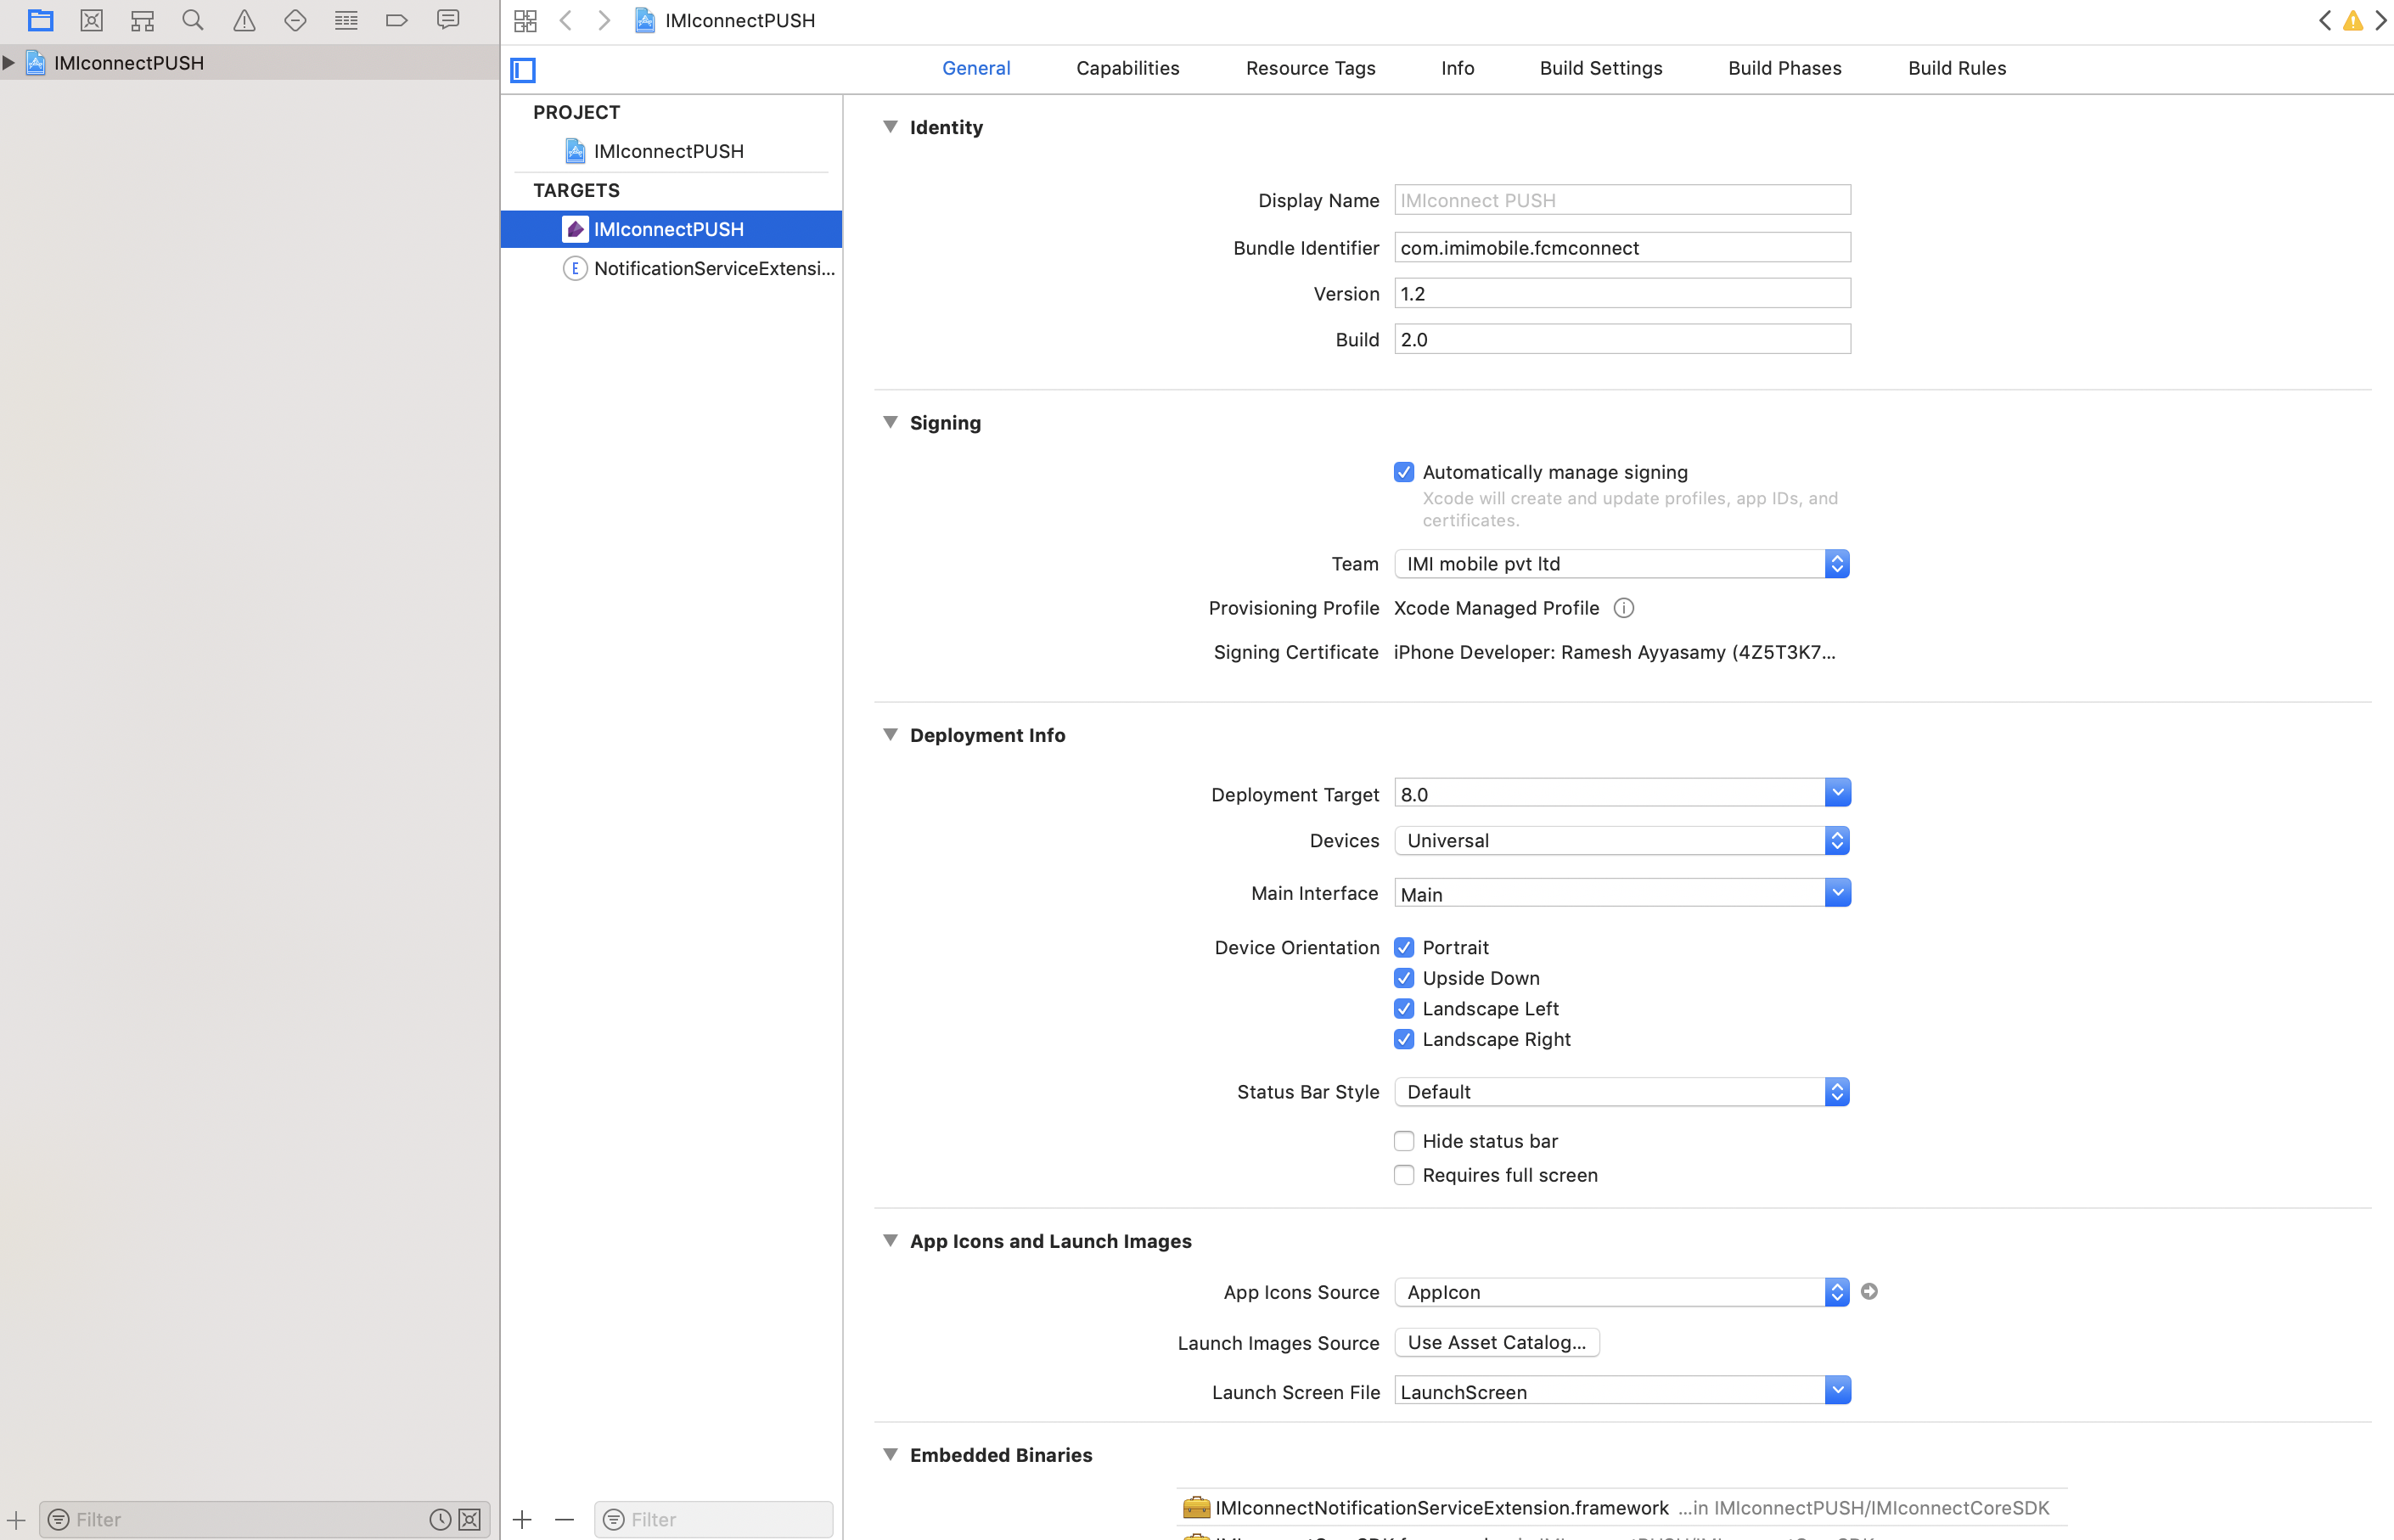
- When adding Extension, you will notice a New Folder in your project hierarchy containing three new files
NotificationService.h,NotificationService.m, andInfo.plist.
a. AddIMIconnectNotificationServiceExtension.framework(available atplugin/src/ios/lib) manually in the new folder.
b. InInfo.Plistof your new notificationextension Target , add App Transport Security Setting Dictionary with Allow Arbitrary Loads; Bool value YES by selecting +. - On the General tab ->Linked Frameworks and Libraries, set the status of
IMIconnectNotificationServiceExtension.frameworkas optional. - Create a Group Identifier. Refer create-an-app-group section in Quickstart Guide for more information.
- Switch ON the AppGroups, then select your group identifier on the Capabilities tab, from main project target as well as from Extension Target.
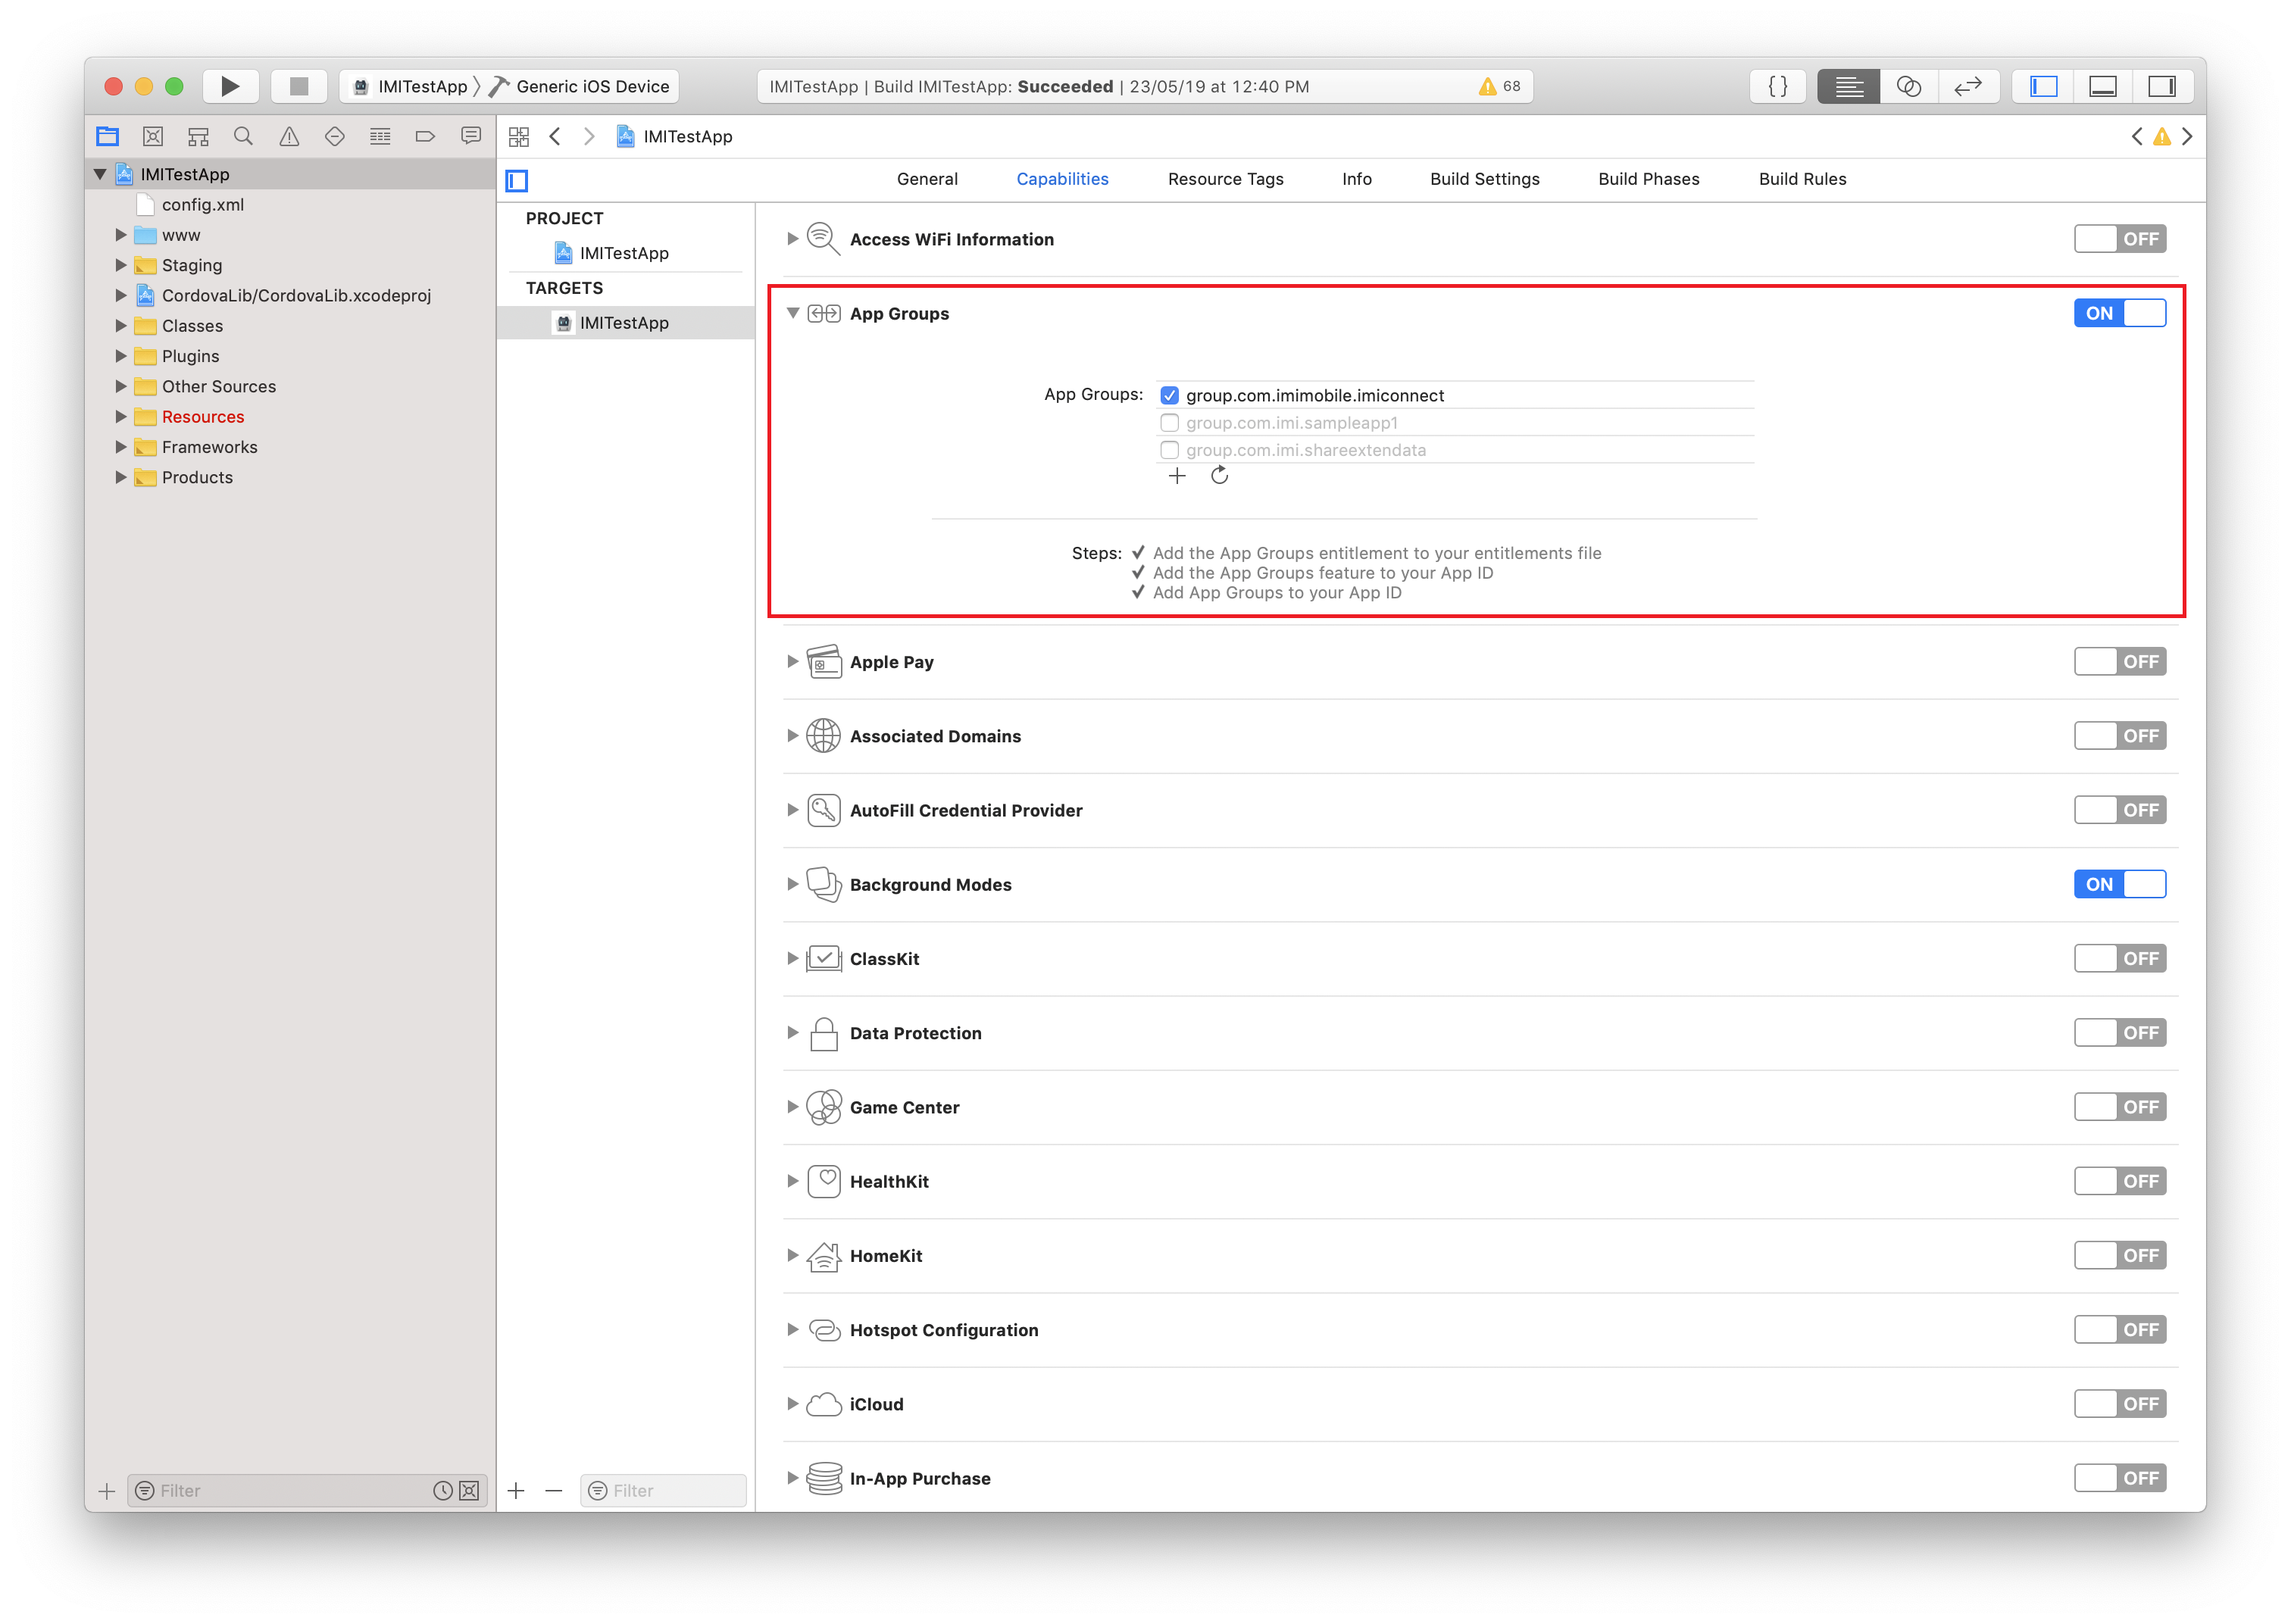
Cordova Plugin Version 2.0.0 or lower
Follow the steps in the given link if you are using Cordova plugin version 2.0.0 or below.
Once done, return to this page and go to step 16.
- Go to the Build Phases tab and click the + button.
- Select the New Run Script Phase option.
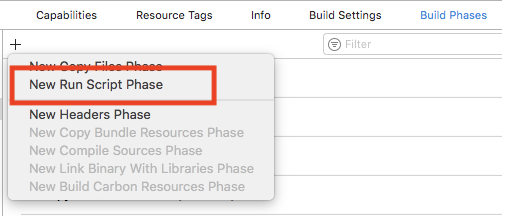
- Copy and paste the contents of the
strip-frameworks.shthat is contained within the plugin zip. - Connect the mobile (device) to your machine to see the connected device on the Scheme menu.
- Click Run button from the toolbar to the left of the Scheme to build, deploy, and execute the application on the connected device.
Now you can see your application running on the device.
For Android App Development
- Configure Proguard Rules.
Add the following rule in the proguard-rules.pro file.
If you use an obfuscation tool other than ProGuard, please refer to the tool providers documentation for configuring equivalent rules.
-dontwarn org.eclipse.jetty.**
-dontwarn com.google.firebase.messaging.FirebaseMessaging
-dontwarn javax.servlet.**
-dontwarn org.slf4j.**

# for sqlcipher
-keep class net.sqlcipher.** { *; }
-keep class net.sqlcipher.database.* { *; }

# WorkManager
-keep class * extends androidx.work.Worker
-keep class * extends androidx.work.InputMerger
-keep public class * extends androidx.work.ListenableWorker {
    public <init>(...);
}
-keep class androidx.work.WorkerParameters

#Proguard rules for HMS
-ignorewarnings
-keepattributes *Annotation*
-keepattributes Exceptions
-keepattributes InnerClasses
-keepattributes Signature
-keepattributes SourceFile,LineNumberTable
-keep class com.hianalytics.android.**{*;}
-keep class com.huawei.updatesdk.**{*;}
-keep class com.huawei.hms.**{*;}
Plugin Initialization
Add a reference to your google-services.json file in the app's config.xml:
<platform name="android">
...
            <resource-file src="google-services.json" target="app/google-services.json" />
       </platform>
Initialize IMIconnectPlugin
Call startup when the device is ready:
IMIconnectPlugin.startupWithConfigOptions(function(status) {
            //result will be Boolean value.
            console.log("IMIconnectPlugin.startupWithConfigOptions(): " + result);
        }, function(error) {
            console.log('IMIconnectPlugin.startupWithConfigOptions() Failed :' + JSON.stringify(error));
        }, {
            appId: "<APP_ID>",
            clientKey: "<CLIENT_KEY>",
            environment: "<SERVER_ENVIRONMENT>"
            serverDomain: "<SERVER_DOMAIN>",
            groupIdentifier: "<IOS_GROUP_IDENTIFIER>",
            allowUnencryptedDatabaseFallback: "false"
        });
Alternatively, you can configure IMIconnect Plugin through config.xml:
```xml
<!-- IMIconnect app credentials -->
<preference name="imiconnect_app_id" value="<APP_ID>" />
<preference name="imiconnect_client_key" value="<CLIENT_KEY>" />
<!-- OPTIONAL Add the IMIconnect's server environment, by default is UK -->
<preference name="imiconnect_environment" value="<SERVER_ENVIRONMENT>" />
<!-- OPTIONAL Add the server domain to override zero-rating domain -->
<preference name="imiconnect_server_domain" value="<SERVER_DOMAIN>" />
<!-- OPTIONAL allows creating a default SQLite database when SQLcipher fails. -->
<preference name="imiconnect_allow_unencrypted_database_fallback" value="<true/false>" />
<!-- OPTIONAL (iOS Only) Application Group Identifier -->
<preference name="imiconnect_group_identifier" value="<IOS_GROUP_IDENTIFIER>" />
```
and call startup when the device is ready.
IMIconnectPlugin.startup(function(result) {
            //result will be Boolean value.
            console.log("IMIconnectPlugin.startup(): " + result);
        }, function(error) {
            console.log('IMIconnectPlugin.startup() Failed :' + JSON.stringify(error));
        });
Code Integration
1. Register
To use the features provided by imiconnect SDK, the app user must be registered with the imiconnect platform. Register method creates a new profile of the user on our profile as part of the registration. If an existing user registers again, the profile creation step is omitted in our back-end.
To register a device with the platform, create an ICDeviceProfile instance and invoke the IMIconnect.register method.
A device profile must always have a unique device id and user-id, if you do not supply a user id then the platform will assign one for you. Typically, you will want to supply your own user-id value that corresponds to a user within your backend systems.
var deviceProfile = new ICDeviceProfile();

            deviceProfile.setAppUserId("9999");

            deviceProfile.setDeviceId("PROVIDE UNIQUE DEVICE ID");

            IMIconnectPlugin.register(

                  function(result){

                        console.log(result);

                  },

                  function(error){

                        console.log(error);

                  },

                  deviceProfile );
2. Connect to imiconnect
To use In-App Messaging you must establish a connection with the imiconnect platform. Invoke the connect method to establish a connection and allow messages to be received.
Once the RT feature is enabled in the app asset created on imiconnect and user registration is done, the App Developer can establish a connection between the app and imiconnect platform by calling the connect method appropriately. This enables the messages sent from imiconnect to be received on the app. When the application is running in the background, SDK is disconnected from imiconnect. While in the disconnected state, incoming In-App messages are not received. However, when the application comes to the foreground again, SDK will establish a connection with imiconnect platform and allows messages to be received.
NOTE
This method throws an error when In-App Messaging is not enabled for the app or a device is not registered with the SDK.
IMIconnectPlugin.connect(
    function(result) {
        console.log(result);
    },
    function(error) {
        console.log(error);
    }
);
3. Receive Messages
Incoming Push and In-App messages are received by registering a MessageListener implementation with IMIconnectPlugin.
Implement your message listener using the following sample code:
IMIconnectPlugin.messageListener(

    function(messages) {

        var text = "";
        for (var i = 0; i < messages.length; i++) {
            text += messages[i].getMessage() + "<br>";
        }

        console.log(text);

    });
4. Listen for connection status events
Events are raised by the SDK whenever the connection status changes. To receive these events in your application; implement and register a connectionStatusChangedListener.
IMIconnectPlugin.connectionStatusChangedListener(
    function(result) {
        console.log(result);
    },
    function(error) {
        console.log(error);
    });
5. Create a Thread
All In-App Messages within imiconnect are grouped by threads. In order to publish messages, you must first create an ICThread object.
When responding to an incoming message, you can obtain the ICThread directly from the incoming message.
var thread = new ICThread();
thread.setTitle("MyTitle");
thread.setCategory("MyCategory");
IMIconnectPlugin.createThread(function(thread) {
    window.alert(thread.getTitle());
}, function(error) {
    console.log(error);
}, thread);
6. Publish a Message
Invoke publishMessage to publish a message to imiconnect.
NOTE
An ICThread object is obtained by calling the createThread method or from a received incoming message.
var message = new ICMessage();
message.setMessage("Test Message");
message.setThread(thread);
IMIconnectPlugin.publishMessage(function(icMessage) {
    console.log(JSON.stringify(icMessage.toJSON()));
}, function(error) {
    console.log(error);
}, message);
7. Disconnect from imiconnect (optional)
This method is used to disconnect from imiconnect. Once disconnected, incoming In-App messages will not be received.
NOTE
This method throws an exception when In-App Messaging is not enabled for the app.
IMIconnectPlugin.disconnect(
    function(result) {
        console.log(result);
    },
    function(error) {
        console.log(error);
    }
);
Updated 5 months ago
Now that you have an app with basic In-App messaging and Push Notification capabilities, refer to the complete IMIconnect Cordova Plugin documentation to know about the advanced capabilities.
